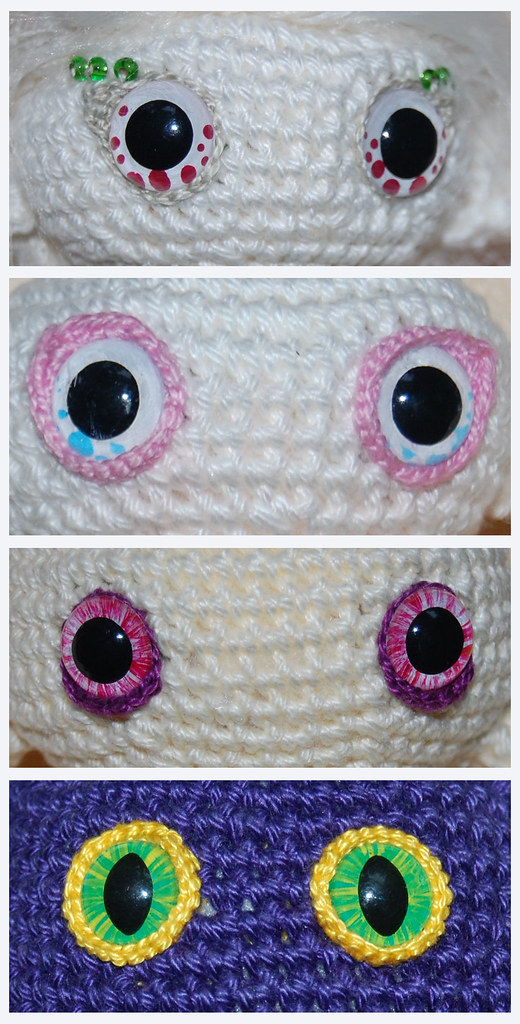
So today everything will be about eyes, sparkling eyes. Eyes like these?
A lot of you have asked me where I get my eyes from and I always needed to say that I make them myself, today I show you how I made them.
What you need
safety eyes, acrylic lacquer and super fine brushes
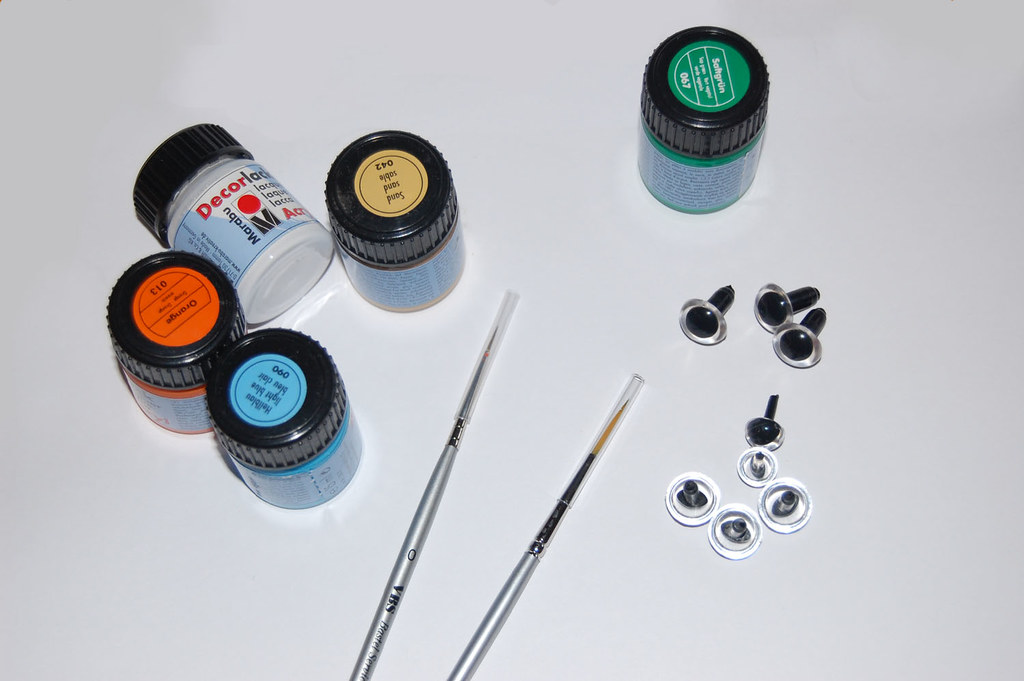
I have loads of simple clear safety eyes, in two different sizes and two different shaped pupils (round and birdishly convex), just enough to have a fitting starting lens for every doll I make. (although I find I most often use the bigger and round shaped eyes)
When you choose the best lacquer take care of solvent and the ground your lacquer is best for (there are special lacquers for a lot of surfaces)
I chose water-based acrylic gloss lacquer that's weatherproof and saliva-resitant (this is pretty important if you make dolls that little children might play with, although I would recommend to crochet eyes and pupils for toddlers instead of plastic ones)
I also dind't buy all sorts of different colors - just a base so I can mix every shade and color I wish for.
step by step
first choose your colors (of course =^_^=)
then decide on the look you want to give your doll, never forget: The eyes are the window of the soul!
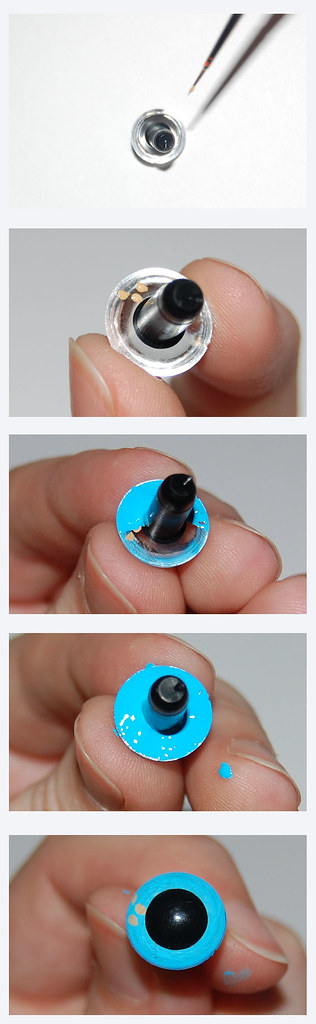
start drawing little details onto the back of your safety eyes, it's a little tricky because of the small size but use the stem to have a little control.
Make little dots or small lines to create a real looking pupil. Dots will create a sparkling effect, dreamy eyes.
Now wait. Wait until the color is completly dry, this can take up to a few hours, it depends on the lacquer you choose and the thickness of the layer of paint.
And when everything is dry add a second layer that covers every millimeter of the back of the eyes. And wait again, this will take longer than before (best you let them dry overnight; I once couldn't wait and screw up a whole doll)
et voila, add to a doll face and enjoy
EXTRA TIP
- take care that your eyes mirror each other (in case you create different sized dots for example)
- repairing mistakes is easy when the paint is still wet, you can rub it away with a simple hanky
- before you try nail polish remover to repair bigger mistakes TEST it on an eye, it might destroy the surface of your plastic eyes
- CLEAN your brushes immediately and thoroughly (lacquer can be very resistant once it's dry and brushes might never become soft again)
A lot of you have asked me where I get my eyes from and I always needed to say that I make them myself, today I show you how I made them.
What you need
safety eyes, acrylic lacquer and super fine brushes
I have loads of simple clear safety eyes, in two different sizes and two different shaped pupils (round and birdishly convex), just enough to have a fitting starting lens for every doll I make. (although I find I most often use the bigger and round shaped eyes)
When you choose the best lacquer take care of solvent and the ground your lacquer is best for (there are special lacquers for a lot of surfaces)
I chose water-based acrylic gloss lacquer that's weatherproof and saliva-resitant (this is pretty important if you make dolls that little children might play with, although I would recommend to crochet eyes and pupils for toddlers instead of plastic ones)
I also dind't buy all sorts of different colors - just a base so I can mix every shade and color I wish for.
step by step
first choose your colors (of course =^_^=)
then decide on the look you want to give your doll, never forget: The eyes are the window of the soul!
start drawing little details onto the back of your safety eyes, it's a little tricky because of the small size but use the stem to have a little control.
Make little dots or small lines to create a real looking pupil. Dots will create a sparkling effect, dreamy eyes.
Now wait. Wait until the color is completly dry, this can take up to a few hours, it depends on the lacquer you choose and the thickness of the layer of paint.
And when everything is dry add a second layer that covers every millimeter of the back of the eyes. And wait again, this will take longer than before (best you let them dry overnight; I once couldn't wait and screw up a whole doll)
et voila, add to a doll face and enjoy
EXTRA TIP
- take care that your eyes mirror each other (in case you create different sized dots for example)
- repairing mistakes is easy when the paint is still wet, you can rub it away with a simple hanky
- before you try nail polish remover to repair bigger mistakes TEST it on an eye, it might destroy the surface of your plastic eyes
- CLEAN your brushes immediately and thoroughly (lacquer can be very resistant once it's dry and brushes might never become soft again)

What a great tutorial! Where do you buy the clear safety eyes? Can you get them in bulk somewhere??
AntwortenLöschenthanks alot Stephanie
AntwortenLöschen^_^
I got mine from ebay, I bought packs of 100 there in several sizes.
This is AMAZING!!! I love your blog and this tutorial is great. You are so creative, I love it.
AntwortenLöschenGreets from Toronto!
Das ist ja wirklich toll! So eine geniale Idee und deine Augen sind so filigran! Danke für diese Anleitung und den klasse Tipp!
AntwortenLöschenDein Blog kommt gleich mal auf meine Blogliste!
Viele liebe Grüße
Anna
Very creative tutorial! I have never used purchased eyes in my Amis precisely because I want the eyes to "say something", but this tutorial is very interesting. Thanks for sharing!
AntwortenLöschen