This tutorial is more a collection of some information to make the best of your amigurumis than a real tutorial that explains a certain technique.
But before we start let me show you the classical version (top) and the improved version (bottom) of a simple round shape.
increases

decreases
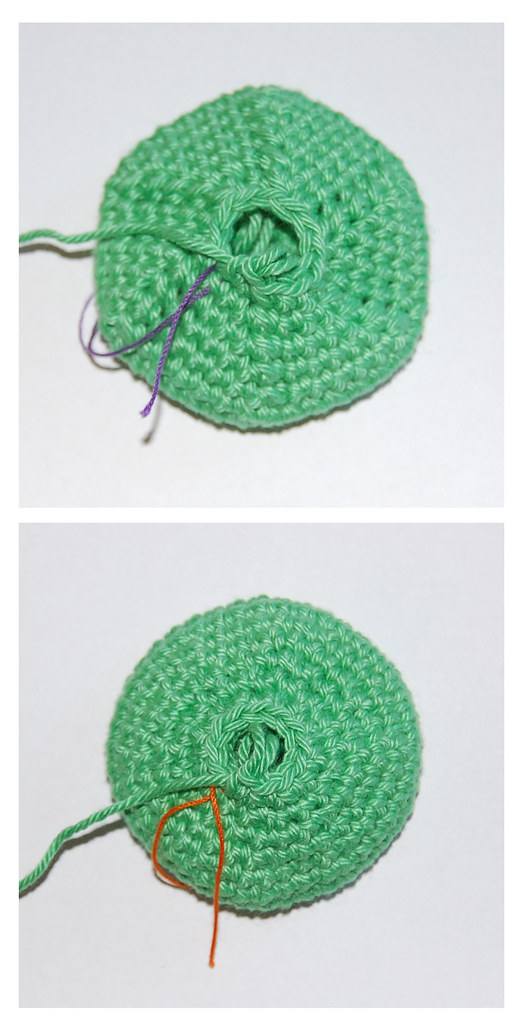
You can easily see that the classical version starts to form to a hexagon whilst the improved version is more round. It's a simple but very effective trick that creates this result:
Shaping
Shaping ends with stuffing your doll. With a good stuffing you can give your doll the final form and even smooth out little mistakes.
But shaping also starts within the crocheting process itself!
A lot of patterns give information like
- increase 6 sts and spread evenly
or
- increase 6 evenly spaced
or
- *2sc in first sc, 1sc in next sts, repeat from * around
so you often will increase one stitch at the beginning of every 'increasing interval' and therefore all your increases will be on top of each other.
There is nothing wrong with this, especially at smaller diameters like we often find when making dolls. But the bigger your diameter gets the more the hexagonal form will want to show off and stuffing will no longer be a solution. Therefore it's a good trick to alternate increasing intervals. In uneven rows start with the increasing as usual, but at even rows make increases in the middle of every section.
example:
uneven rows: (make 2 sc in first st, x number of sc) repeat six times around
even rows: x/2 number of sts, (make 2 sc into next st, x number of sts) repeat 5 times, make 2 sc into next st, x/2 number of sts
so in uneven rounds, you more or less only divide one increasing section and make a certain number of sc before you start increasing. This way you will have 12 sections instead of 6 and your hexagonal form will become rounder.
This also works great for the decreasing of a round shape.
Decreasing invisibly
Decreasing most often is done with pushing and pulling your hook through the next two sts one after the other, yarning over as you do so, and finally drawing the yarn through all three loops on the hook:
you will end up with one stitch instead of two - you decreased one stitch. If you click on the picture above you can see more details but also you can see that the decreased stitch is easily recognised: the loops lean to the left.
When you compare the two pictures of the decreases in the classical and improved version (above) you can also see that making decreases on top of each other makes them recognizable even more easily - so try to avoid this like described under shaping.
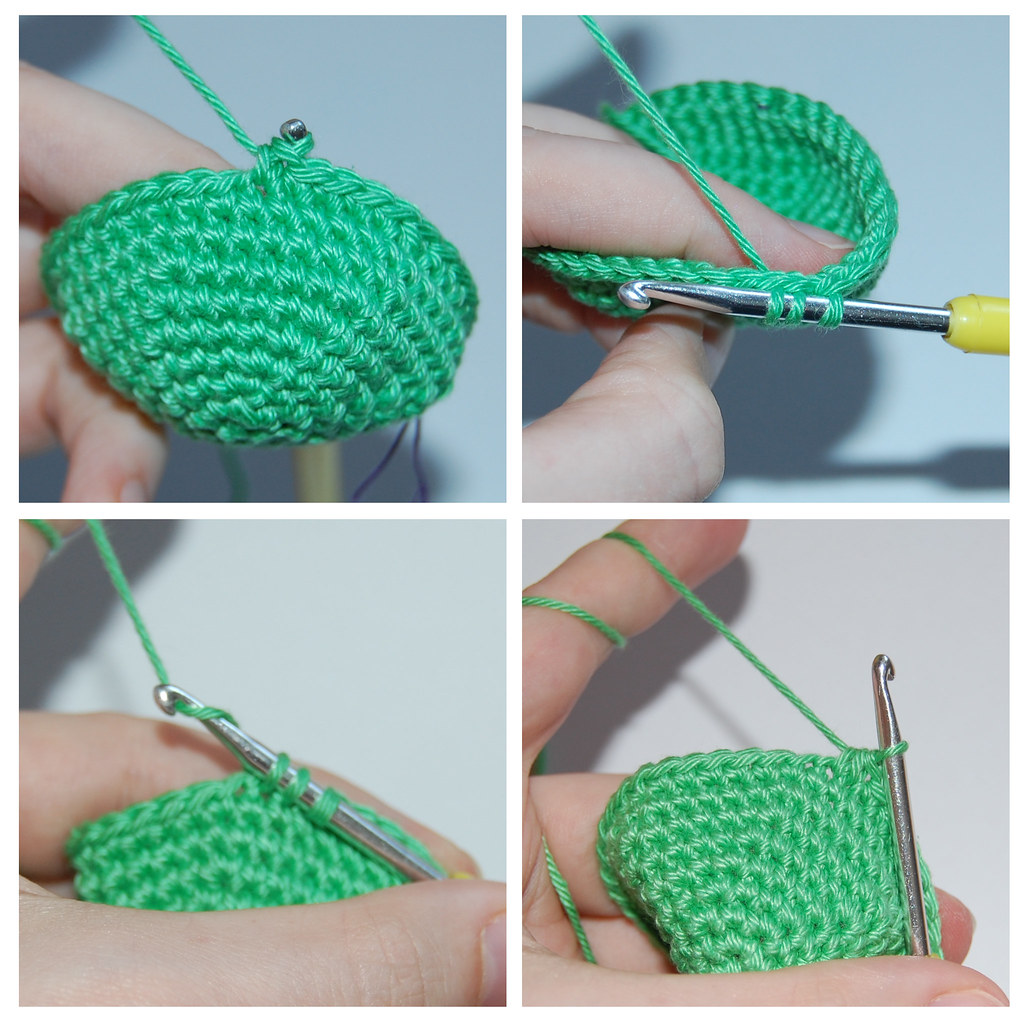
The next series of pictures illusrates how to decrease a stitch and don't have anybody recognize it.
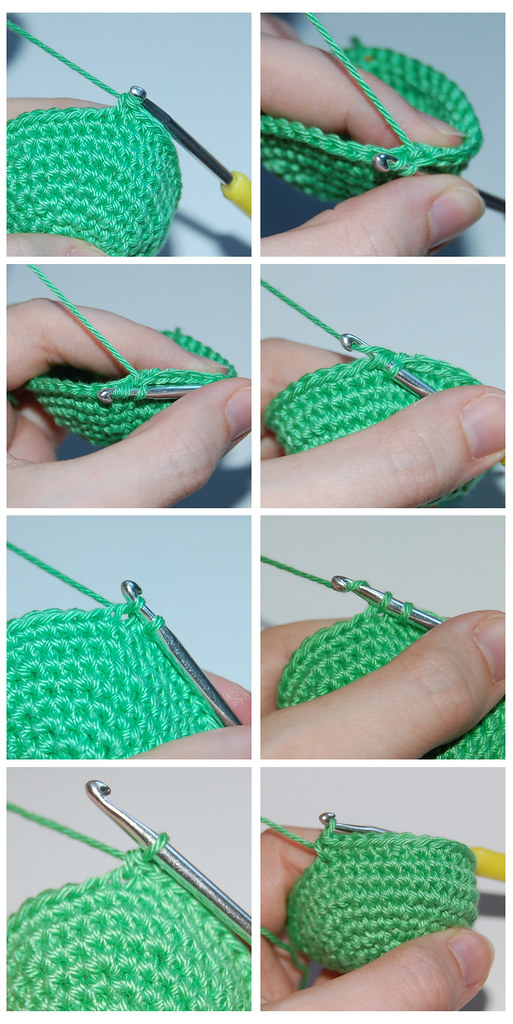
1 - before you started a decrease
2 - push your hook through the front loop of the next stitch
3 - push your hoop through the front loop of the next but one stitch as well
4 - yarn over
5 - pull yarn through the first two loops on hook
6 - yarn over again
7 - pull yarn through all loops on hook (two)
8 - decreased stitch (right in the middle of picture, 5 sts from hook end)
you can hardly see the decrease at all, isn't that great?
But before we start let me show you the classical version (top) and the improved version (bottom) of a simple round shape.
increases
decreases
You can easily see that the classical version starts to form to a hexagon whilst the improved version is more round. It's a simple but very effective trick that creates this result:
Shaping
Shaping ends with stuffing your doll. With a good stuffing you can give your doll the final form and even smooth out little mistakes.
But shaping also starts within the crocheting process itself!
A lot of patterns give information like
- increase 6 sts and spread evenly
or
- increase 6 evenly spaced
or
- *2sc in first sc, 1sc in next sts, repeat from * around
so you often will increase one stitch at the beginning of every 'increasing interval' and therefore all your increases will be on top of each other.
There is nothing wrong with this, especially at smaller diameters like we often find when making dolls. But the bigger your diameter gets the more the hexagonal form will want to show off and stuffing will no longer be a solution. Therefore it's a good trick to alternate increasing intervals. In uneven rows start with the increasing as usual, but at even rows make increases in the middle of every section.
example:
uneven rows: (make 2 sc in first st, x number of sc) repeat six times around
even rows: x/2 number of sts, (make 2 sc into next st, x number of sts) repeat 5 times, make 2 sc into next st, x/2 number of sts
so in uneven rounds, you more or less only divide one increasing section and make a certain number of sc before you start increasing. This way you will have 12 sections instead of 6 and your hexagonal form will become rounder.
This also works great for the decreasing of a round shape.
Decreasing invisibly
Decreasing most often is done with pushing and pulling your hook through the next two sts one after the other, yarning over as you do so, and finally drawing the yarn through all three loops on the hook:
you will end up with one stitch instead of two - you decreased one stitch. If you click on the picture above you can see more details but also you can see that the decreased stitch is easily recognised: the loops lean to the left.
When you compare the two pictures of the decreases in the classical and improved version (above) you can also see that making decreases on top of each other makes them recognizable even more easily - so try to avoid this like described under shaping.
The next series of pictures illusrates how to decrease a stitch and don't have anybody recognize it.
1 - before you started a decrease
2 - push your hook through the front loop of the next stitch
3 - push your hoop through the front loop of the next but one stitch as well
4 - yarn over
5 - pull yarn through the first two loops on hook
6 - yarn over again
7 - pull yarn through all loops on hook (two)
8 - decreased stitch (right in the middle of picture, 5 sts from hook end)
you can hardly see the decrease at all, isn't that great?
This is great, too! Does that decreasing stitch have a name?
AntwortenLöschenHey Elizabeth, I have no idea if this stitch has a name, but if I ever find out I'll post it here, maybe just "invisible decrease" or something like that
AntwortenLöschenThats fantastic!!!
AntwortenLöschenIt's always bugged me that rounds become hexagons....you're a star! Thanks for sharing
Thanks for the reply! I may look that up and see what I can find.
AntwortenLöschenThis is really great! You should call the decrease a dek. It reminds me of decking someone ;). You get ride of the stich entirely.
AntwortenLöschenpuedes ilustras el aumento para que parezca mas redondo con fotos , como tienes las disminuciones invisibles con fotos? porque al traducir tu blog no lo entiendo muy bien como aumentas para que quede mas redondo, gracias ;)
AntwortenLöschenGreat post! So much good information.
AntwortenLöschenGreat idea! Makes me want to crochet a little animal right now, just to try it : )
AntwortenLöschenhi there!! i came across your blog a while back and revisited it today. i am a little confused with the invisible increase. do you have a video? i don't quite understand the instructions. THANKS
AntwortenLöschenHi,
AntwortenLöschendid you click the pictures? they enlarge and it makes it a little easier to see the details.
but I want to make a few videos soon, and update my tutorials, hope that will help
Diana
thanks for your response, but am still a little confused with the increasing.
AntwortenLöschenI don't quite understand what you mean to do on the 'even rows'. what is "x/2"? please explain this a little better.
"so in uneven rounds, you more or less only divide one increasing section and make a certain number of sc before you start increasing. This way you will have 12 sections instead of 6 and your hexagonal form will become rounder."
was that supposed to read 'even' instead of 'uneven'??
thank you again and i apologize for the inconvenience but GREATLY appreciate your help :) if it is easier you can email me.
Hi,
AntwortenLöschenno, it's perfectly fine to answer here, maybe someone else will find this helpful as well :)
even rows are actually only rows like: row 2 or row 4 and so on, so more or less every second row,
this also refers to the "x/2" ... in "even rows" let's say row 8, you normally would increase like this: *sc6, increase stitch* repeat six times around ... the "x" refers to the sc6 in this case, so x=6, divided by 2 ("x/2") you would increase this row like this: sc3; *increase stitch, sc6* repeat 5 times around, increase stitch, sc3 ... so you shift the increase stitch 3 stitches further in to make the rounder shape as above
Diana
AWESOME!! thanks a bunch!!!
AntwortenLöschenyou're welcome :)
AntwortenLöschendon't forget to join the Lion CAL I start at the moment, it's a nice opportunity to see the increasing in action ;)
take care,
Diana
Hello! I want to start amigurumi as soon as possible, but not sure about the technique yet. Thanks for your tutorial, I will use it for my amigurumi project in future!
AntwortenLöschenHave a nice day!
http://hindustanka.blogspot.in/
Hi Indianka
AntwortenLöschenhave fun :)
Such an awesome trick!!! Thanks for sharing, I hate those little holes when decreasing and the resulting hexagonal shape. I'll try it right now!
AntwortenLöschenThat is really nice looking. Do you have invisible increases?
AntwortenLöschenHi betty,
Löschenhmm, not sure if there is something like this, I just make sure to not top them on each other, so they're less visible. Please have a look at my shaping tutorial for this :) I think you can see what I mean there