9/17/2007

short update


so first my shruggi progresses, even if I didn't planed to do so, but knitting is less hard for my wrists than crocheting
apropos crocheting - I've finished my latest Sheldon, he's custom and waiting for his new mommy to catch him (and he's sitting on my new printer, yay)


and while putting him together I had the idea of a hermit crab amigurumi, I might be crochting it on my trip to London, which starts in two days and curiously enough I don't feel any nervousness or anything alike, yet
and that's really strange because the hole act of buying the tickets and stuff was totally against my nature and all, I'm not a spontanous person, one should think I might feel something, but there is really nothing, well there is this feeling of 'hopefully, I'm not forgetting anything', but that is really all - strange
well, lets see what happens tomorrow


Also, was gibts neues, mein Bolero wächst immer weiter, jetzt sind schon drei Knäuel drin. und ich hab natürlich auch meinen Sheldon fertig gekriegt, wurde ja auch Zeit, seine neue Mutti wartet schon.
Und während ich ihn so zusammenfügte, da hatte ich plötzlich die Vision eines Einsiedlerkrebs-Amigurumis, den werde ich vielleicht auf meinem Weg nach London machen.
Und London rückt auch immer näher und kurioserweise macht mich das in keinster Weise irgendwie nervös. Und das ist sehr merkwürdig, man sollte annehmen, dass eine Reise ganz allein in die weite Welt einen irgendwie beeinflussen sollte.
Naja, mal sehen wie es morgen aussieht, momentan versuch ich nur meine Tasche zu packen und ja nichts zu vergessen.

9/14/2007

about shrugs and tree trunks

lovesexy grows again, after realizing that I need to make both shoulder parts before starting to knit in the round and making the ribbing, I made both shoulders and started to rib for about four rows (just until my ball of yarn was all eaten up)
and that was the point when I said to myself IT IS TIME TO CROCHET, DUDE !!!

so I started on another Sheldon - lovely

and this morning I received mail that the new issue of knitty was out, uuuuuh lovely so much more
I think I'm gonna make Henry, the stitch pattern is adorable (might even be nice for knee-highs, mh) and of course woodins, well not the woodins themselfs but the tree trunk, that's just great and would be perfect for my trolls: to play hide and seek maybe (who knows what they're doing when I'm not around ;-)

lovesexy wächst weiter, gestern hab ich bemerkt, dass ich erst beide Schulterteile fertig machen muss, ehe ich anfangen kann den breiten Bund rundrum zu stricken. Also hab ich beide Schulterteile gestrickt und mit dem Bund begonnen, zumindest für vier Reihen, weil dann mein Bällchen alle war, aber das war der Zeitpunkt als mir ganz und gar klar wurde, dass ES ZEIT ZUM HÄKELN IST; KUMPELINE !

und so hab ich einen neuen Sheldon angefangen - niedlich

und heut früh kam Post, dass die neue Ausgabe von knitty fertig ist, noch viel hübscher. Ich werd wohl auf alle Fälle Henry machen, das Muster ist fantastisch und gibt vielleicht auch einen hübschen Strumpf ab, mal gucken.
Und OH da sind noch die woodins, naja nicht die woodins selbst aber ihr Baumstamm, der ist toll und wird ein tolles Accessoir für meine Trolle abgeben, wer weiß schon was die treiben, wenn ich nicht zu Hause bin ;-)

9/13/2007

lovesexy grows

click picture for larger version

it's going on and on and on
the progress on my lovesexy shruggie: the back is mainly done and I'm about to start knitting in the round.
on the right side you can see the "shoulder" part and the new cast on to form the armhole. Closing the round and making the shouler on the left and then round and round and round, round.
I'm thinking about a simple 2x2 ribbing just like I've seen it so often, BUT there is the idea of a mesh-stitch border that keeps me or rather stopps me from continuing.

so today will be crocheting day (and that is sooo needful cause some customers are waitung for their amigurumis)

und weiter gehts und weiter und weiter
mein lovesexy Teilchen wächst, der Rücken ist schon fertig und ich bin kurz davor die Runde zu schließen und mit dem "Rand-Kragen" anzufangen.
rechts kann man meine Schulter sehen und die neuen Maschen, die mal das Armloch werden sollen.
Eigentlich wollte ich den Rand mit nem einfachen 2x2 Bundmuster machen, aber weil ich ja schon einen Moosstich (oder wie immer der heißen mag) auf dem Rückenteil gemacht hab, überleg ich, ob ich das weiter mache. Naja hat Zeit . . .
Heute ist erst mal Häkeln angesagt, ist auch bitternötig einige Amigurumis warten auf Fertigstellung und Versand.

9/10/2007

first blog feature

uuuuuhh - how cool

thank you so much kiss the frog for featuring me

if you wanna see the post click here


wie geil!
das erste Mal in nem anderen blog, hach toll.
Danke kiss the frog
wenn ihr mal gucken wollt

lovesexy shrug


inspired by the lot of shrugs and boleros I see on ravelry I wanted to make one by myself, so I started swatching and gauging and counting and making stitch-patterns and voila - my provisional casted on beginning of lovesexy.
I wanted to make something with the 'Yes-Heart' from Prince's lovesexy era. I always loved that sign, it' pure positivity - Y E S


Inspiriert von den ganzen Shrugs und Bolerojäckchen, die ich so bei ravelry zu sehen kriege, wollt ich meinen eigenen haben. Also ans Zeichenbrett begeben und angefangen zu skizzieren, rechnen, Maschenproben auszählen und was sonst noch dazu gehört und schwuppsdiwupps - der provisorische Anfang von Lovesexy.
Ich wollte etwas mit dem 'Yes'-Herz aus Prince's lovesexy Ära haben. Das Symbol hat mir immer schon gefallen, es ist so schön einfach und aussagekräftig - J A


9/07/2007

candle flame poncho


my candle flame poncho
I've finished this lovely piece last autumn and some days ago I added pictures to my flickr, so I was able to add this knitted poncho to my ravelry projects
and very unexpectedly people commented and favoured the pictures, and a big question arised: HOW did you do that?
well, I just knitted it, of course that's not the whole truth but for some reason it is: it started as a normal candle flame shawl and I simply stopped increasing on the left side when I reached the width I wanted to have. But now the whole story . . .

mein candle-flame-Poncho
Den Poncho hab ich schon letzten Herbst fertig gekriegt aber erst vor ein paar Tagen hab ich davon Fotos gemacht um sie zu meinen ravelry Projekten zufügen zu können.
Überraschenderweise haben sich direkt einige Leute dafür interessiert und Kommentare abgegeben, aber vor allem eine Frage kam auf: WIE hab ich das gemacht?
Naja, eigentlich hab ich einfach gestrickt, natürlich ist das nicht die ganze Wahrheit, aber irgendwie schon, denn eigentlich hab ich einfach den Shawl angefangen und dann links keine weiteren Maschen zugenommen als ich die gewünschte Weite erreicht hatte. Aber nun die ganze Geschichte . . .


First I had the pattern of the candle flame poncho, which I fell in love with the first moment I laid eyes on and second I had this beautiful yarn, some balls of a mint-green color and some in a pale yellow (the layout above gives an idea of what I wanted my poncho to shape like and I planed to form rows of yellow and green)
So I started to knit the poncho: I casted on a stitch and followed the instructions for the shawl, after finishing some flames or leaves, whatever you wanna call it I was forced to realize that I simply hadn't enough yarn, not at all!
One ball knitted into the pattern and only about 20 leaves (which was only a corner) and I figured I would need more yarn, MUCH more yarn, so checking my yarn shop, and -taataa- biiig problem, there wasn't enough yarn in my colour
*thinking*
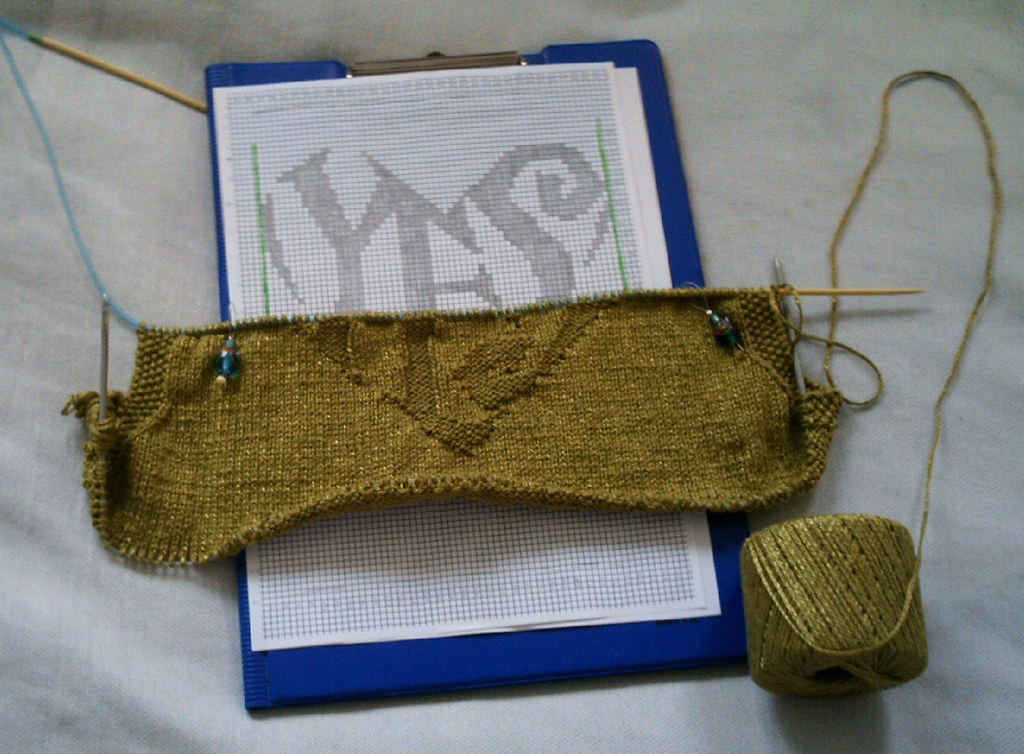
and reordering my ideas for the colours of the poncho, I bought like six more colours and about 15 more balls and created something like the next picture, it's not the original draft (I seem to have thrown it away) but it's showing quite nice, what I had in mind

Also, was ich hatte war die furchtbar schöne Anleitung für den Shawl und ein paar Knäule Garn in einem blassem Gelb und Grün. Ich begann zu stricken, einfach der Anleitung für den Shawl folgend und musste sehr bald feststellen, dass mein Garn auf gar keinen Fall reichen würde, auf gar keinen Fall! Ein Knäul war verstrickt und ich hatte gerade mal 20 Flammen oder Blätter (wie auch immer) gestrickt, das machte nur eine kleine Ecke des zukünftigen Ponchos aus, also bin ich wieder in den Wollladen und musste erschrocken feststellen, dass meine Farben nicht mehr vorrätig waren
*überlegenderweise nach Hause*
ich hab mich dann entschlossen einige weitere Knäule zu kaufen in etwa sechs weiteren Farben und eine Skizze erstellt, in etwa wie das nächste Bild (es ist nicht die originale Skizze, zeigt aber ziemlich genau, was ich im Kopf hatte)


starting again I followed the pattern until I reached the width I wanted my poncho to have (in my case 12 leaves wide) and worked intarsia to integrate the new colours. (if it was really intarsia I can't tell, but it's very close to that technique and I think describes the best, what I did)
always following my sketch

Wieder angefangen habe ich denn wieder der Anleitugn für den Shawl gefolgt, bis mein Poncho die Breite erreicht hatte, die er sollte (~ 12 Blätter) und hab dann mittels Intarsien die weiteren Farben eingearbeitet
immer meiner Skizze folgend


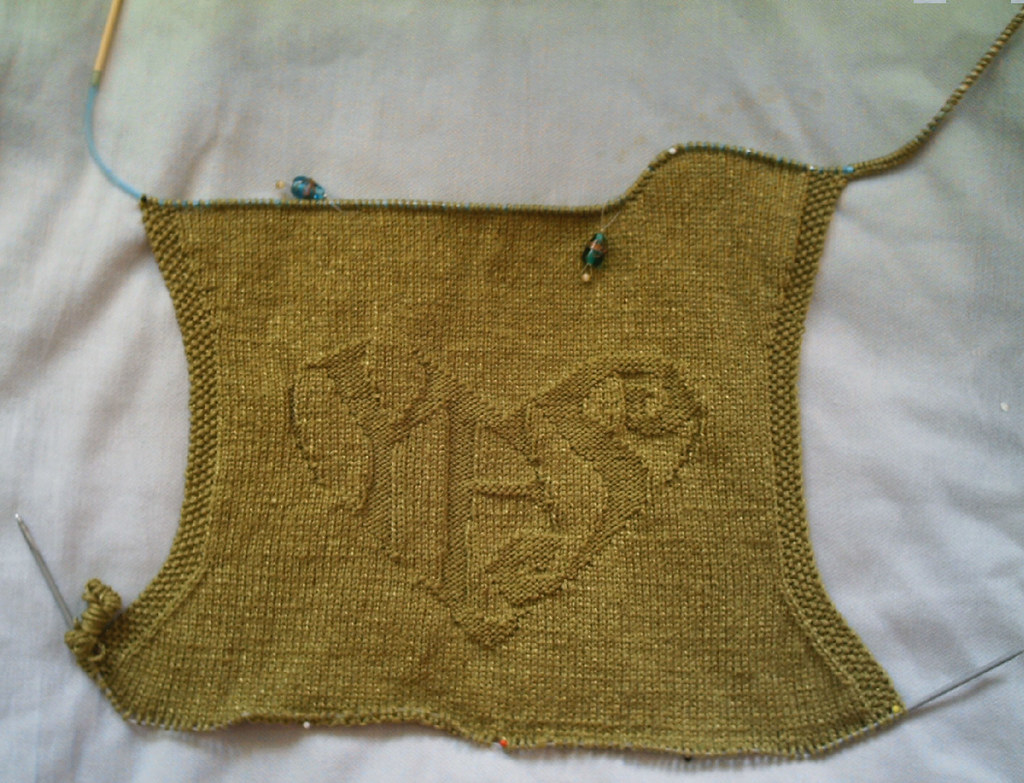
and this picture somehow shows the way I stopped increasing on the left side, but still continued to increase at the right. When I had the lenght I wanted to achieve I stopped increasing at the right as well, which automaticly leads to a decreasing edge and therefore ending.
the 'just stop' increasing is not that simple, you still need to knit2together to get rid of the purl2 bridge which is made between every candle flame, but if you follow this, it's really all I've done.

das obige Bild zeigt wie ich die Rechteckform gemacht habe, indem ich auf der linken Seite nicht weiter Maschen zugenommen habe, aber an der rechten Seite eben schon. Als ich die Länge erreicht hatte, die ich wollte, hab ich dann auch auf der rechten Seite aufgehört zuzunehmen und das führte dann automatisch dazu, dass sich der Shawl ausdünnte und somit endet.
Die Aussage *einfach nicht mehr zunehmen* stellt sich nicht ganz so einfach dar, denn man muss schon noch die Randmaschen zusammenstricken, um die 2LM-Brücke zwischen den einzelnen Blättern aufzulösen, aber wenn man das macht, ist das quasi exakt das, was ich auch gemacht hab.


finishing: seaming one side only leaving space for the head

Fertig machen: eine Seite zusammennähen und nur Platz für den Kopf lassen