Posts mit dem Label flower pot werden angezeigt. Alle Posts anzeigen

6/06/2008

FO - - flower pot


it's done, it's finished, finally! Never thought it would take this long, but it's the assembling, always this oh so enoying assembling. But I did it ^_^

isn't it lovely?
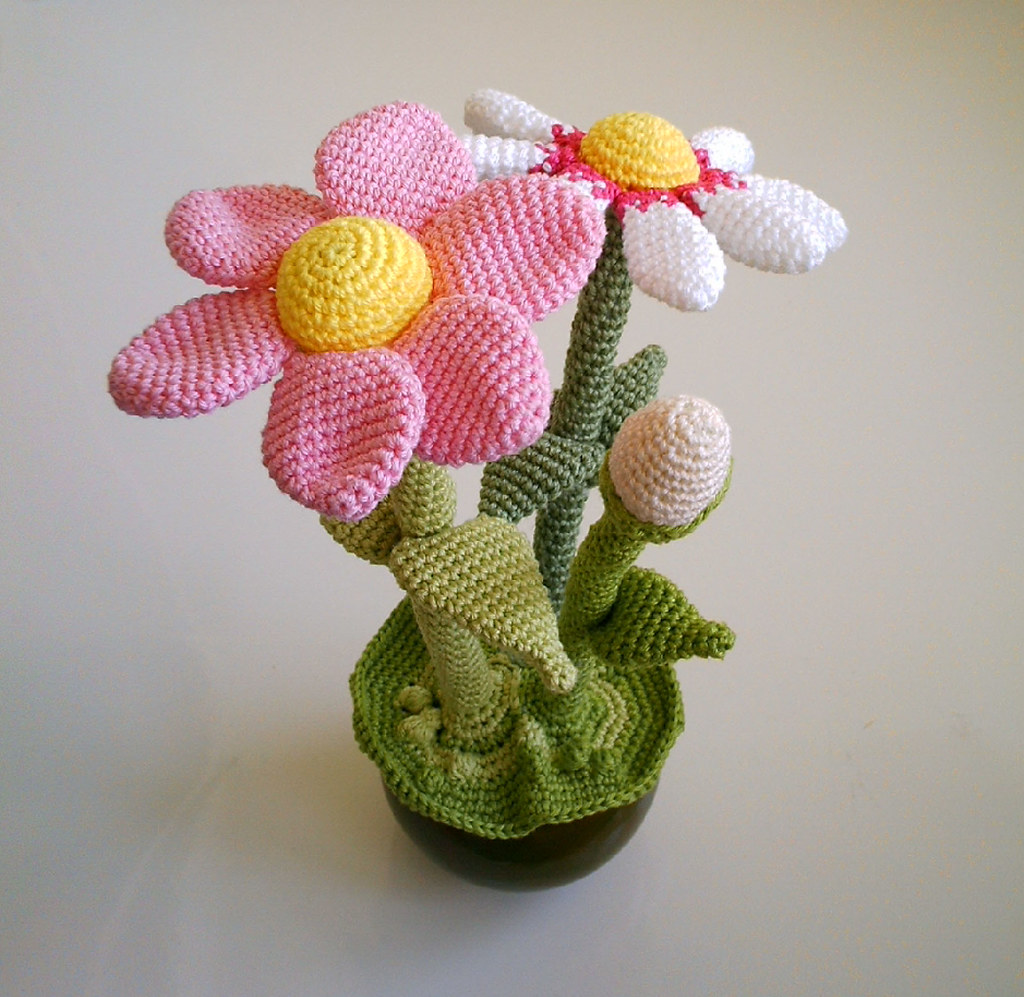

and so beautiful?
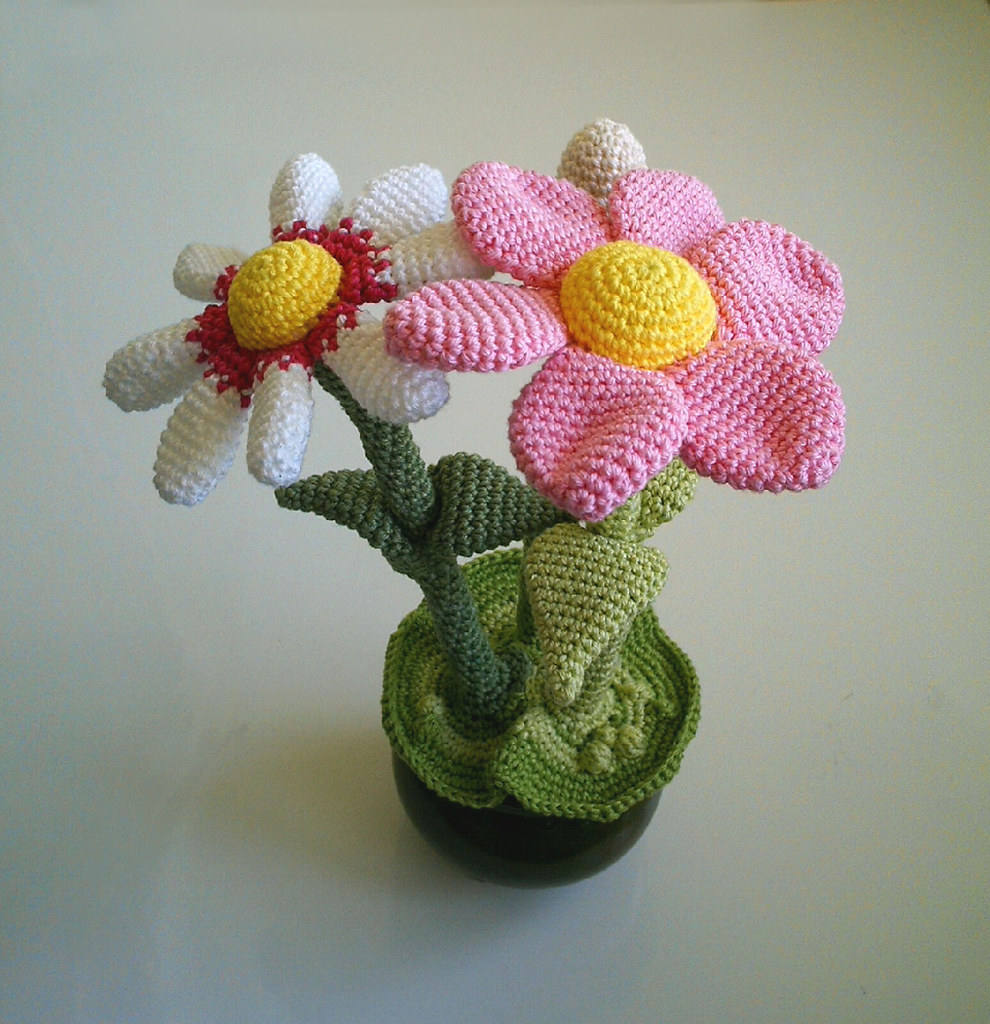

and so unique?


I truely love it!


the pattern will be available as .pdf download soon, of course for free, but until now you will need to see the single blog posts on flower potti, sorry for the long way round


uh, something very important, when having sewn the lawn to the ground, you will need to push the florists wire through the buds and stems to give the flowers its stand. The important thing: you might need more than one string of wire per flower, depending on the weight of the flowers head. For example I needed only one (I added two nevertheless) for the white bud without petals, but the pink flower needed four wires to stay up, so I guess either you use thicker wire or you use more than one.

6/05/2008

a little bit like christmas

today three packages were waiting for me when I came home from work, yeah packages, gifts, presents, christmas for me, me, me ^_^
and opening I found this

WOLLMEISE, oooooh, **drool**
Frosch and Rhabarber
the lovely Claudia offered to get me some, when going to see (she saw!!!) the Wollmeise on a yarn market near her and look what she brought me


oooh, drooling little bit more


and also the spinning can begin now, well almost, since I don't have roving yet, BUT, today I also received my first book on spinning, it's full of pictures (which should have been quite obvious, since it's called teach yourself VISUALLY spinning) and I think very useful


and my new niddy noddies and a nostepinde, so I can wind my new yarn in whatever I like, yeah


Also I finished flower potty, FINALLY
can't believe this took so long, well the actual crocheting was finished some time ago (think about the beginning of may) but assembling is really something that stops me from finishing, I just don't like it and get distracted too easily with new projects, but it's finished now, pictures will follow tomorrow, when it's better light. And also a very useful tip: don't forget to stuff the full lenght of your stems before you sew them to the earth ball, otherwise (I learned just now) you a) can un-sew it from the earth or b) like I did, push stuffing through the little holes between the crochet stitches very carefully

5/20/2008

flower pot - nine: nearly FO

it's nearly done! The flower pot grew and it's the first post this month on flower potti - can't really believe it. Well knitting is tempting and can really consume so much time without me realizing it (it just doesn't need as much looks onto the pattern)

What I've done in the meantime: I've made the earthball, that will hold the flowers to the pottery.


and the ball of 'earth' put into the pot:


it's supposed to fit into th pot, you might need to change the pattern, that I give here, since the pattern I made is for bulbous flower pots.

what I did:

the Ball of Earth

1 -- make 6 sc into dr
2 -- (m2) x6
3 -- (m2, sc1) x6
4 -- (m2, sc2) x6
5 -- (m2, sc3) x6
6 -- sc2, (m2, sc4) x5, m2, sc2
7 -- (m2, sc5) x6
8 -- sc3, (m2, sc6) x5, m2, sc3
9 -- (m2, sc7) x6
make 6 rows = sc 54
16 -- (sc2tog, sc7) x6
17 -- sc3, (sc2tog, sc6) x5, sc2tog, sc3
make 5 rows = sc 42
23 -- (sc2tog, sc5) x6
24 -- (sc2tog, sc4) x6
25 -- (sc2tog, sc3) x6
26 -- (sc2tog, sc2) x6
27 -- (sc2tog, sc1) x6
stuff
28 -- sc2tog x6
BO

what you might change:

if your flower pot has a bigger circumference at the bottom, you might need to increase one or two more rows. the circle made should be almost as big as the bottom of your flower pot, but not equally big or even bigger. It will stretch when stuffed. Then just make several rows until the hight of your crochet will be as high as the pot you use. If your flower pot has a tapering form you also should increase one row in the midde of your crochet (six increases evenly spread) or one row every third part of your flower pot. When reached the desired hight just decrease six stitches every row (see row 16 and following).
You're done!

=)

Now you need florists wire, I've used something that's already cut into pieces:


wind the wire around a pencil and bend it just like in the picture. This bended part will be positioned in the pistil of the flower heads.


Before finally sticking the wire into the flower stems fix the lawn onto the earth ball and sew both together. When done "screw" the wire into the flowers, start at the pistil and carefully screw the bended wire into the flower heads, this bending will keep the wire from sticking out accidently.

I guess you're done, the flower pot is ready to use.

4/29/2008

flower pot - eight, a lawn to be


so the flower pot is growing again. As mentioned yesterday I started assembling the three flowers together. To do so isn't very difficult alltough I can't really give you a real pattern, it is quite freeform but I tell you how I did it and I believe it will be a good guide.

oh first I need to tell you I made 6 more rows of stem for the two blooming flowers (I didn't edit this in the former posts yet)
so that is now 36 rows for the pink/white flower and 41 rows for the pale pink flower.

when all flowers have the size you want them to grow *giggle* you go on like this

make 2 sc in every sc in the first row
and *m2, sc1* till end of row two


now you need to attach all flowers together. I hope this picture clarifies what I mean. There will be stitches of every flower that you don't crochet anymore, so you continue to crochet around the first flower about two thirds - then add the second flower and crochet another two thirds around, add the third flower and you got all flowers 'bond' together.
in this third row increase like following: *sc2, m2* till end of whole row (which is all three flowers for each about two thirds of the circumference)

now increase every other row like follows:
*sc3, m2* in the fourth row
*sc4, m2* in the fifth row
*sc5, m2* in the sixth row
and so on until you have the lawn size you desire.

a big thing also is, that when being "between two flowers" (ie. in the valley of a row I decreased one or two stitches)
one stitch in the first rows after assembling and two times in every other row, also I found to decrease with dc instead of sc to be quite useful, since the row itself would become more even, so your lawn will become more of a cirle than this roller coaster rows (hope you can understand what I mean, if not just leave a message)

also I added bobbles wherever I liked to add some texture to the lawn, I think it resembles some kind of grass.

now either you make the lawn as big as you like, like a hill or something (I would only increase as mentioned above every second row after I have some circumference, so it would look more like a hill and simply crochet a 'plate' (increasing 6sts evenly spread) to have a base for your hill and stuff this hill

or

like I will do, make an earth clog that the lawn will be sewn to and added to a potery flower pot.

hope to be finished until this weekend (it's mayday soon, a whole day for me to use my hooks and needles ^__^)

4/20/2008

flower pot - seven: about buds and stems

netx step of the flower pot. This was a bit tricky, I had this idea of a bud in my head with a green leave surrounding the bud just like it would start to bloom every second. The bud was a quick crochet but this leave around the bud? mmmh, tricky. But I made it, so here is the next flower with a bud and stem and leaves
and the very next step will be to assemble all three flowers together and make some kind of grass or meadow . . .


the bud itself

BUD (N 3,5)

1 -- make a dr with 6 sts
2 -- (sc1, m2) x3
3 -- (m2, sc2) x3
4 -- (sc3, m2) x3
make 1 row
6 -- sc2, (m2, sc4) x2, m2, sc2
make 1 row
8 -- (m2, sc5) x3
make 1 row
10 -- (sc2tog, sc5) x3
make 1 row
12 -- sc3, (sc2tog, sc4) x2, sc2tog, sc1
make 1 row
14 -- (sc2tog, sc3) x3
15 -- sc2tog x6
BO


the bud-leave

BUD-LEAVE and STEM (N 3,5)

make a slip knot
1 -- chain 22
turn and start in second back 'loop' from beginning:
2 -- sc21, join round
continue in spiral rounds
3 -- sc5, esc2, hdc1, dc3, hdc1, esc2, sc6
4 -- sc4, esc1, hdc2, dc2tog, dc2, dc2tog, hdc2, esc1, sc5
5 -- sc1, sc2tog, esc2, esc2tog, hdc1, dc2tog, hdc1, esc2tog, esc2, sc2tog, sc2
6 -- sc2tog x7
continue making rows of sc7 to create a stem


the leaves for the stem

LEAVES (N 3,5)
extra, small

1 -- make a dr with 4 sts
2 -- sc1, m2, sc2
3 -- sc2, m2, sc2
4 -- (sc2, m2) x2
5 -- (sc3, m2) x2
6 -- (sc4, m2) x2
7 -- (sc5, m2) x2
8 -- (sc6, m2) x2
make 2 rows
11 -- (sc6, sc2tog) x2
12 -- sc1 and pM to start a new round, don't turn
13 -- (sc5, sc2tog) x2
14 -- (sc2tog, sc2, sc2tog) x2
BO


as soon as I made them stem and sewed everything together I'll make some pics of the assembled flower

see you later

4/15/2008

flower pot - six, on assembling

as promised here are a few of the new pictures, and guess what, I sew petals to stems, yeah-hey. All in all this took me about two hours, though I think one could do faster if one loves seaming. For the pink flower I only used six of the eight petals I made in the first place, I found them to be more than enough and for the white flower I used eight petals, I thought seven would be enough but seemed like I could use eight, so I made one more.


but here is the new picture


for flattening the petals (and leaves too) simply fold along the increases resp. decreases, they should be on top of each other and therefore the petal / leave should fold by itself. For attaching them to the pistil simply lay them flat and close to the middle of pistil and sew them. I've sewn them where yellow and green meet hope the picture below makes clear what I mean.


For the next flower (I wanted to make three) I think I would like a bud, maybe white surrounded by a beautiful green or a pale yellow, don't know yet. I am also thinking about how to make the flowers stable, cause the heads are pretty heavy. So far I believe some flower wire (with green plastic material around them, normally its associated with oxeye daisies) will be perfect to stabilize the stem. Maybe simply screwn into it, from top down. But hey just another challange to overcome (^_^) within this journey of designing.


btw I hope you guys enjoy the pattern so far, when everything is done I'm gonna turn it into a .pdf so you can simply download it.

4/14/2008

flower pot - five, medium leaves

Hi guys, it's already to dark to make good quality pictures of my progress (which isn't too far, I've only made 7 petals total of the thin white/pink petals) and decided on a leave size for this 'medium' flower. I still haven't sewn anything together, did I mention before I don't like assembling? Well to me it's always what takes most time, for example there is a top in my stash which is finished, more or less, it only requires seaming.

But enough of bad habbits, here is a new piece of the flower pot pattern

leaves (N 3,5)
extra, make 2

medium

1 make a double ring with 4sts
2 sc1, m2, sc2
3 sc2, m2, sc2
4 (sc2, m2) x2
5 (sc3, m2) x2
6 (sc4, m2) x2
7 (sc5, m2) x2
8 sc5, m2, sc6, m2, sc1
9 sc6, m2, sc7, m2, sc1
make 2 rows
12 (sc7, sc2tog) x2
13 sc1 and pM to start a new round, don't turn
14 (sc6, sc2tog) x2
15 (sc2tog, sc3, sc2tog) x2
BO


I will take some pics tomorrow and edit this post, and maybe, just maybe I'll be a good cat and sew something together.
so far, enjoy

4/11/2008

flower pot - part four, medium flower


last evening and even today in my office (shame on me) I made this new pistil and stem and two petals (yeah!) for a medium sized flower. I like the gradient from white to pink of the petals, this is a little delicate to make, but I would give it a try, it's not that hard. The pattern nevertheless doesn't mention the change of colors, it's in the note below, how to make the gradient.
I also didn't attach the petals of the first flower, I don't like assembling, but I would add four 'upper' petals and four 'below' petals, so they're overlapping each other, hope you understand what I mean.


Pattern - medium sized flower: pistil plus petals


pistil and stem (N3,5)
start with a nice (pale) yelllow

1 -- make a double ring with 6sts
2 -- m2 x6
3 -- (m2, sc1) x6
4 -- (m2, sc5) x3
5 -- sc4, (m2, sc6) x2, m2, sc2
make 1 row
change color to green
make 1 row
8 -- (sc2tog, sc2) x6
9 -- (sc2tog, sc1) x6
10 -- sc2tog x2, sc1, sc2tog x3, sc1
make 30 rows and BO

stuff while adding stem rows, don't put to much stuffing into the stem, it tends to shine through here


petals (N3,5)
extra, make 6 (?)

1 -- make a double ring with 6sts
2 -- (sc1, m2, m2) x2
3 -- sc3, m2, sc4, m2, sc1
4 -- sc4, m2, sc5, m2, sc1
make 2 rows
7 -- (sc5, sc2tog) x2
8 -- make 1 row
9 -- sc1 and pM to start a new round, don't turn
10 -- (sc4, sc2tog) x2
11 -- make 1 row
12 -- sc1 and pM to start a new round, don't turn
13 -- (sc3, sc2tog) x2
14 -- make 1 row
BO -- cut yarn with app. 16inch/ 40cm

NOTE: to make a gradient, add different colored yarn in round 11, now make the row but with changing colors for each stitch, in round 12 cut the first color and continue working with your new yarn.

4/09/2008

flower pot - part three, the petals

first flower nearly finished, eight petals made and only assembling left to make it a "real" flower ^_^

remember not to join rounds, it's only continuous crocheting, always spiralicious, never turn

petals (N3,5)
extra, make 8 (maybe 10)

1 -- make a double ring with 6sts
2 -- m2 x6
3 -- (sc4, m2, m2) x2
4 -- sc5, m2, m2, sc6, m2, m2, sc1
5 -- sc7, m2, sc9, m2, sc2
6 -- sc8, m2, sc10, m2, sc2
make 2 rows
9 -- sc8, sc2tog, sc10, sc2tog, sc2
10 -- sc8, sc2tog, sc9, sc2tog, sc1
11 -- (sc8, sc2tog) x2
12 -- sc1 and pM to start a new round, don't turn
13 -- (sc5, sc2tog, sc2tog) x2
14 -- sc1 and pM to start a new round, don't turn
15 -- (sc3, sc2tog, sc2tog) x2
BO -- cut yarn with app. 16inch/ 40cm


for the next flower I'm thinking of a flower quite like this one, only a little smaller and with thinner petals, maybe even with two-colored ones

but before musing on the next blossom I should assemble this one first, mmmh . . .

4/07/2008

flower pot - two, the leaves

this is so exciting I've already finished the leaves

but before I give you the next part of the pattern, the leaves, let me show you why everything started


this is the clover that died in the dry light of the burning sun over easter holidays -- poor clover

nevertheless, let's get back to happier things

big leaves for a beautiful flower

leaves (N3,5)
extra, large
make 2

1 -- make a double ring with 4sts
2 -- sc1, m2, sc2
3 -- sc2, m2, sc2
4 -- (sc2, m2) x2
5 -- (sc3, m2) x2
6 -- (sc4, m2) x2
7 -- (sc5, m2) x2
8 -- sc5, m2, sc6, m2, sc1
9 -- sc6, m2, sc7, m2, sc1
10 -- sc7, m2, sc8, m2, sc1
11 -- sc8, m2, sc9, m2, sc1
make 3 rows
15 -- (sc9, sc2tog) x2
16 -- sc1 and pM to start a new round, don't turn
17 -- (sc8, sc2tog) x2
18 -- (sc2tog, sc5, sc2tog) x2
19 -- (sc2tog, sc3, sc2tog) x2
BO -- cut yarn with app. 16inch/ 40cm

4/06/2008

flower pot - part one

So let's start right along:

here's the first part of the pattern

the pistil and stem

start with a nice (pale) yelllow
1 -- make a double ring with 6sts
2 -- m2 x6
3 -- (m2, sc1) x6
4 -- sc1, (m2, sc2) x5, m2, sc1
5 -- (m2, sc7) x3
6 -- sc4, (m2, sc8) x2, m2, sc2
make 1 row
change color to green
make 1 row
9 -- (sc2tog, sc3) x6
10 -- (sc2, sc2tog) x6
11 -- (sc2tog, sc4) x3
make 1 row
13 -- sc2tog x7, sc1
make 35 rows (8sts), or as long as you would like the stem to be

stuffing: start stuffing when you have made a few rounds of the stem (not too many though); stuff the pistil pretty tight, I tend to overstuff, but when stuffing the stem don't stuff so tight the filling might shine through

don't BO yet - cut yarn with app. 2m (3 arm's lenght) tail


I'm working with a 3,5 mm (E) hook and a tight tension, this will create a pistil/stem of about 18 cm/ 7 inches

yarn: catania from schachenmayr
stuffing: poly fibrefill


amigurumi spring with me

hey everybody, some days ago, when sitting in my office and looking at my poor dead clover I head a great idea: never again a plant will die just because no-one will break into my office and water my plants whilst I'm a few days on the road.
So I started thinking about an amigurumi flower pot to highlight my office window sill, a lovely spring colored flower pot.

and the best of all, this idea turned into the plan to share share my pattern with you, while I'm designing. You get a free pattern plus the fun of a crochetalong. ^_^

I have something like this in mind.


I was thinking about crocheting the pot itself too, but prefer the view of a real one, so you will need yarn, a crochet hook and a flower pot too (about 3-4 inches / 8-10 cm in diameter)

I'm really gonna try to give you new bits of the pattern every few days, but may apologize before starting if it might take some days longer sometimes. But I'm gonna do my best.

I've choosen some very springy colors, pale yellow for the pistil, a pale green for leaves and stem, and think of a cute pink for the petals of the first flower, others may be orange or red or purple, don't know jet.


These are my colors.


yarn: catania from schachenmayr
hook: 3.5 (E)

so let's start . . . part one


oh, but before
my abbreviations

m2 -- make two, increase one by making two sts into one
sc -- single crochet
sc2tog -- decrease one by crocheting two sts together
BO -- bind off

and it's amigurumi style crochet, which is spiral rounds: keep crocheting in the round without joining at the end of one row