Posts mit dem Label journals werden angezeigt. Alle Posts anzeigen

3/01/2015

and then a new year started

Hello my lovelies,

long time no see, right?
well to make a long story short, last summer I was bored of the internet, then I was busy applying for new position within my company, and whohhoooo I got the job! :)
In January I started the new job, better money, better evening times, but completely different schedule. I was working as a med rep and now I'm working from desk again, so completely different, but I love it!
And the real big bonus, I have free evenings again. As a med rep your day is quite nice when out and about and visiting your clients, but when you come home there's still a lot of work waiting at your "home office". I loved the fee spirit of my former position but OMG I so enjoy my evenings and sundays now. Nothing to do than cooking, family, friends and knitting.
And I can tell you there has been a lot of knitting happening this year already. I'm about to finish my second cardigan this year. Two knitted cardigans in just two month. That's an awful lot of knitting in my world!

But first let me show you a few impressions from the last couple of month, in case you don't follow my instagram (which you should, Tee-hee!)

-- Hallo ihr Zuckerschnuten

ganz schön lange ausser Sicht, was?

ja, da gab's so einiges in den letzten Monaten was mich vom Rechner ferngehalten hat:
zuerstmal keine Lust auf Internet, ja sowas passiert. Dann wurde es aber spannend. Ich hab mich für eine neue Stelle innerhalb meiner Firma beworben, aufreibende und aufregende Phase. Und, ja, ich hab die Stelle :)

Im Januar ging es los. Komplett neuer "Stundenplan". Vorher war ich im Aussendienst, jetzt wieder am Schreibtisch. Die freien Abende jetzt sind toll. Im Aussendienst kann man sich zwar seinen Tag super frei einteilen, aber abends sitzt man dann meist am Rechner und macht noch sein Büro. Jetzt sind meine Abende und Sonntags plötzlich wieder frei und das ist großartig. Zeit für kochen, Familie, Freunde und stricken.
Und da gab's schon ne ganze Menge stricken dieses Jahr. Ich hab doch echt schon zwei Strickjacken fertig, also fast, die zweite ist praktisch auch fertig, noch knapp 10cm Ärmel. Und das in zwei Monaten, verdammt viel stricken in meiner Welt :)

aber zuerst einpaar Eindrücke aus den letzten Monaten, auf Instagram war ich nach wie vor recht fleißig, ihr solltet mir da echt folgen, hihi

I made a hat for myself -- eine Mütze für mich

I went a little crazy with washi tape for my journaling -- ein bisschen arg wishi-washi ;) bei meiner Art des Project Life

I made a "pinterest made me do it cake", looked fantastic, tasted good, was my birthday cake, somehow -- mein erster Blumenkuchen, frei nach pinterest, toll geworden ist er, und sowas wie mein Geburtstagskuchen

I went stash busting and came home with these beauties (they're going to be a cardigan too, desk people can wear a lot of cardigans, right?) -- beim Wollwechsel war ich auch, aus gefühlt 20 Teilen wurden diese drei Schönheiten, sie sollen auch eine Strickjacke werden, am Schreibtisch kann man doch bestens Strickjacken anziehen, oder?

made a hat for my man and enjoyed autumn: -- eine Mütze für ihn gab es auch

enjoyed the "Lichtgrenze", marking 25 years of a united Germany, with light balls all along the former wall of Berlin -- und wir haben die Lichtgrenze abgelaufen, schon beeindruckend war das

started my first cardigan, and went all happy over my first vertical buttonhole -- die erste Jacke, mit vertikalem Knopfloch, ich war so stolz auch mich

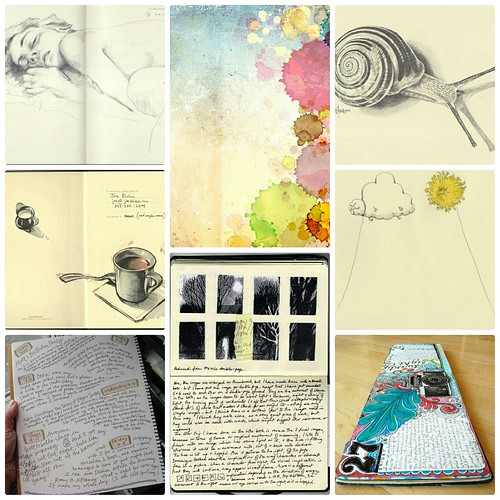
showed a few of my journal pages -- ein kleiner Einblick in meine Tagebücher

finished the first cardigan (of a few more to come) -- die erste Strickjacke ist fertig

ate a weird egg for breakfast -- ein äusserst komisches Ei zum Frühstück

started the next cardigan -- und die zweite geht los

bought him some flowers for Valentines Day -- ich hab ihm Blumen zum Valentinstag mitgebracht

ate "a bit" of sushi -- ein klein wenig Sushi gab es auch

and

last but not least caught the cold so I had some time with TV on the sofa. -- und zu guter Letzt hat mich ne dicke Erkältung vor den Fernseher auf die Couch gebannt

I hope you had a nice last six month as well and read you soon :) -- ich hoffe eure letzten Monate waren toll, bis bald

hugs, Diana

8/18/2014

journal update

it's been a while, since I showed you my brand new fauxdori. I still use and love it a lot. But one little thing bothered me. On Friday night I finally did something about it:
I realized that I only needed two journals in there. As much as I love all these full stuffed, packed midoris /travelers notebooks I see online, I needed to be self-critic and confess, I need just two!
But putting two notebooks into a midori isn't that easy. You can use an additional elastic to fix the second book to the first one, but that wasn't my cup of tea, too floppy. So I changed the elastic on my notebook to a thinner one. I threaded the new elastic twice to mimic two elastics and therefore have two strings to attach my notebooks. It works wonderfully :)

update_journal

now you might ask what I use my fauxdori for?
mainly as a diary mixed with some sketches and doodles and a few photos. The second notebook serves as my knitting/crochet notebook on the road. I have a few notebooks for all my wips but sometimes when I'm leaving the house it's nice to have it all in one place. So the second one gets filled with notes on exactly these projects, small ones, like coasters or my latest "butterfly project" (I will tell you more on this soon)

I'm not ready yet to let you get a clear view inside my books, but I'm sure I will add a few pics sooner or later

so long, have a wonderful week my lovelies

__________

ist schon ne Weile her, dass ich von meinem fauxdori erzählt hab. Nun ja, ich nutze es stetig und liebe es innig. Eins hat mich allerdings gestört. Und Freitag hab ich dann endlich was dagegen unternommen:
Ich musste einsehen, dass ich nur zwei Notizbücher da drinnen brauche. Egal wie sehr ich die Bilder der vollgestopften midoris die ich online so sehe auch liebe - ich brauche nur zwei Bücher! Allerdings ist es ungleich schwerer nur zwei Bücher in so ein midori reinzukriegen, klar kann ich ein extra Gummi nehmen und so das zweite am ersten befestigen, aber so richtig war das nichts für mich, einfach zu labberig. Also hab ich einfach mein Gummi ersetzt durch ein dünneres. Dieses hab ich dann zweimal durchgezogen und so quasi zwei Gummis geschaffen von denen jetzt jedes ein Notizbuch hält. So funktioniert es einwandfrei :)

Nun fragt ihr euch aber bestimmt was sind denn nun die beiden Notizbücher?
eins dient mir als Tagebuch, da wird reingeschrieben, gemalt und ab und an auch mal ein Foto eingeklebt. Das andere hab ich für "unterwegs Strick und Häkelprojekte". Ich hab dutzende Notizbücher für meine ganzen Wollarbeiten, aber dann das eine zu finden, was nun zu dem einen Projekt gehört, was ich grade mit zu meinem Freund nehme? Da war es einfacher einfach die Anleitungen / Details in ein extra Büchlein zu schreiben, gesagt getan!

Eins von diesen Projekten handelt übrigens von Schmetterlingen, aber da ein andern mal von mehr, bis dahin eine ganz tolle Woche für euch

5/31/2014

DIY - travelers notebook

PicsArt.com
<< den deutschen Post findet ihr weiter unten >>

_____

so let's make a travelers notebook today, shall we? I mentioned I made a midori style notebook the other day. I liked the midori the minute I first saw it, but didn't like I couldn't get the paper in a store. The original midori is a travelers notebook that's become quite popular lately and I wanted one to fit regular moleskine notebooks. So I made one.

here you will see how I did it and that you can make it as well. It's been very quick and satisfying to hold the finished piece within two hours.

What you'll need: leather, about 2-3 mm thick, it should be sturdy enough to fold around a notebook and give it support. An utility knife and I recommend a metal ruler, a pencil and some elastic band.

first: measure out the size you will need for your notebook. I sized mine 21,5 cm x 28,8 cm to cover moleskine cahiers. I gave a little extra on top/bottom and to the sides to allow the leather cover to hug around my notebooks. Once you measured draw the outline onto the wrong side of your piece of leather (I got mine from ebay in case you wondered) and with the help of your metal ruler and knife cut it out. It takes a few cuts to get through leather, but it workes surprisingly well.

collage_20140518102731144.jpg

now let's round the edges. If you don't care about rounded edges, just skip this step. I tried a few coins to see how much curve I wanted for the edges and went for a 1 cent piece in the end. To cut the edge I didn't cut in a long stroke like for the sides but pressed the utility knife down into the leather little bit by bit next to the coin. This made an interesting sound ^__^ and once I cut the edge of I cleaned it while still holding the coin firmly in place and now actually cutting along the coin with the knife, easy peasy

collage.jpg

to punch the holes into the leather for the rubber band I used my handy hole puncher, you can use an awl of course as well. It's the original leather tool to make holes. Just pushing a needle with the elastic through the leather might cause the leather to tear with time.
I marked 5 holes total, all along the middle of the leather. Two on top and bottom each and one in the middle.

collage_20140518103147513.jpg

I used a normal sewing needle and some extra thread to make a "artificial extra big" eyelet, pulled the elastic through this super big eyelet and pulled the elastic through the top and bottom holes of the leather cover like pictured below:

collage_20140518103304419.jpg

For my first notebook I made a classic knot, you can see the grey elastic below. With my second notebook (it was just so much fun, I had to make a second one) I made a different knot. It's pictured in the red elastic and I let it open to take the picture. This type of knot is a lot flatter than the one I used for the gray elastic and therefore fits much better. (Both knots probably have fancy names but I don't know them, if you do, please name them below in the comments section, thank you)
What you can also see in the pic below is that the elastic should cause some tension on the leather cover, this will flatten once you put a notebook inside and will help pulling the notebook into cover.

collage_20140518102009783.jpg

to finish it off I added a little piece of ribbon to the inner part of the elastic to work as a book mark and also made a loop out of a second piece of elastic which I pulled through the hole in the middle of the notebook cover. This will close your travelers notebook later. You can see the knot inside the notebook below and also how a moleskine looks once inserted.
(just open the notebook along the middle and pull it through the top elastic band, so the 'upper' part of the elastics will lay inside your notebook and the knotted part of the elastic lays between the notebook back and the leather, if you need more pictures on this step and also how to include more than one notebook, just leave me a comment)

collage_20140518103532307.jpg

that's it! I told you it was pretty simple ^__^

_____

Also lasst uns heute ein Reisenotizbuch machen, ja? oh je, Reisenotizbuch klingt ja auch toll, travelers notebook ist doch irgendwie cooler, naja ^__^
Ich bin über das Midori gestolpert vor ein paar Wochen und war gleich verliebt, simple und funktionell, sowas wollte ich auch. Was ich allerdings nicht so toll fand war, dass ich die Bücher für das Midori nicht überall im Laden bekomme. Die Originalbücher sind deutlich schmaler als unsere handelsüblichen Notizbücher. Also hab ich mir eins gemacht in dass ich einfach Moleskines legen kann, die gibt es ja inzwischen in praktisch jedem Buchladen.

Ein travelers notebook zu machen (entschuldigt, ich bleib hier bei englisch) geht ziemlich schnell und macht einen sehr zufrieden, so schnell Resultate zu sehen ist einfach schön

Was braucht ihr? ein Stück Leder, ungefähr 2-3mm dick, ein Teppichmesser und ich empfehle ein Metalllineal dazu, was zum aufzeichnen und Elastikschnur.

und wie funktioniert's nun?

zuerstmal hab ich mein Notizbuch ausgemessen und an allen Seiten ein klein wenig mehr Spielraum eingerechnet, so dass ich am Ende 21,5mm x 28,8mm auf die Rückseite des Leders aufgemalt hab. Das ganze dann mit dem cutter Messer ausschneiden. Man muss ein paar mal drüber gehen über das Leder, aber es schneidet sich erstaunlich gut.

Um die Ecken abzurunden hab ich einfach eine Münze genommen und das Messer jetzt Stück für Stück ins Leder gedrückt. Schneiden klappt hier nicht so richtig, dazu ist der Winkel einfach zu klein. Aber drücken klappt ganz gut, klingt auch toll und zum Schluss hab ich dann noch versäubert indem ich mit dem Messer dann doch entlang der Münze geschnitten hab, ganz leicht.

Dann markiert ihr die Löcher für das Gummiband. Je zwei oben und unten und eins in der Mitte. Alle entlang der Mittellinie des Lederstücks. Ausgestanzt hab ich die dann mit meinem Gürtellochstanzer (original nimmt man eine Ahle, die hab ich aber nicht da)

So, und nun nur noch das Gummiband durch die Löcher fummeln, dafür einfach eine Nadel nehmen, ein Stück Faden rein und verknoten als extragroße Öse und dann wie oben abgebildet durch die Löcher ziehen.

Verknoten. Nach meinem zweiten Versuch empfehle ich den Knoten in dem roten Gummiband nachzumachen, der liegt viel flacher im Notizbuch als der graue. (da gibt's bestimmt tolle Namen für die jeweiligen Knoten, die kenn ich aber nicht, falls ihr die kennt, dann lasst mir doch einen Kommentar da)
ja und dann seht ihr oben noch, dass das verknotete Band das Buch unter Spannung setzen sollte. Die gibt sich sobald man ein Buch reintut und hilft nachher auch das Buch an Ort und Stelle zu behalten.

Noch ein Stück Schleifenband als Lesezeichen oben dran und eine Schlaufe aus dem Gummiband durch das Mittelloch ziehen (ihr seht den Knoten in der Mitte auf dem letzten Bild) und fertig. Notizbuch mittig aufschlagen, durch die obere Gummibandschlaufe ziehen und tata!

Falls ihr doch noch Bilder braucht wie ihr die Bücher reinbekommt, und wie man mehr als ein Notizbuch ins travelers notebook kriegt, dann gebt mir einfach in den Kommentaren Bescheid.

_____

that's it for today, have a great weekend, Diana

5/14/2014

new supplies

Oooh yeah - my mailbox was full yesterday and the leather for my journal project arrived. And to pamper myself a little (I've been working like a maniac the last days) I went shopping today. I got a few new pens and watercolor brushes and a travel box for my half pan watercolors.

IMAG5548.jpg

It feels so damn good to know I will be drawing again. During the last few days I often caught myself smiling while realizing my mind was drawn to sketching ideas.

It's such a good feeling, almost like freedom, like going back to my roots. Very weird but very fascinating and satisfying at the same time. Awesome!

This new freedom when thinking about drawing also makes my "designing juices" flow again. I'm thinking about amigurumi cats. There is this new way of ears I want to try soon. I bet you will like it.

________

Ja! Ja! Ja, gestern war das bestellte Leder im Postkasten. Und, heute war ich ein bisschen shoppen und hab mir ein paar neue Stifte und Pinsel und nen Reisetuschkasten für meine Aquarellfarben besorgt. Ich bin super neugierig auf diese bläulichen Pinsel, die haben nämlich ein Wasserreservoir im Stiel, ist bestimmt extrem praktisch für unterwegs.

Dieses ganze endlich-wieder-malen Ding fühlt sich unglaublich gut an. So ein bisschen wie ein Befreiungsschlag, als ob ich zu meinen Wurzeln zurück kehren würde. Ganz komisch irgendwie. Neue Freiheit durchs zeichnen.

Und diese ganze neue Zeichenfreude lebt sich auch sehr spannend auf meine Amigurumi Designs aus. Grade schwirren mir Katzen durch den Kopf. Ich hab da eine Idee für Ohren, die ihr so bestimmt noch nicht gesehen habt ^__^

Bis bald -- Read you soon, Diana

5/10/2014

procrastinating the enthusiastic way

Today I need to do my office, instead I can't wait for some leather to arrive so I can make myself a midori, which will be filled with moleskine notebooks.

Lately I've started a Filofax again and as I'm drooling through other blogs and videos on journals I came across midoris. Oh how awesome are these? I immediately fell in love and very quickly began to design my own in my mind. As much as I love the midori style I don't like that you can't buy the refills in a regular bookstore. Moleskins you can. So next best thing to do is make my own.

I plan to transfer my 'dear diary' style journal into one.

Today I spent most of my day looking through moleskins on pinterest. I even made a new board just for this purpose.

Back in school and university I used to draw a lot, I even planned to go to art college. But starting to work I drew less and less, I always figured I didn't have enough space. Now I imagine a daily diary with my sketches. It will be so awesome!

How do you spend the weekend?, xo Diana

collage.jpg

Heute sollte ich eigentlich mein Büro machen, aber ich kann kaum erwarten, dass das Leder ankommt, was ich die Tage bestellt habe. Ich habe nämlich vor mir ein Midori zu machen.

Ich hab ja seit ein paar Wochen wieder einen Kalender und wie ich mir so die filofaxe auf anderen Blogs und Videos ansehe, bin ich über Midoris gestolpert. Ich war sofort verliebt und hab direkt angefangen mir meinen eigenen im Kopf zusammen zu stellen. So toll ich die Midoris auch finde, doof finde ich, dass man die refills nicht einfach im Laden kaufen kann. Mit Moleskine geht das. Also mach ich mir meinen eigenen.

Ich hab vor mein Tagebuch darein zu packen.

Heute habe ich also die meiste Zeit des Tages damit verbracht mir Moleskins auf pinterest anzusehen. Ich hab sogar ein eigenes Board dafür angelegt.

Als ich noch in der Schule und in der Uni war, hab ich ziemlich viel gezeichnet. Ich hatte sogar vor Kunst zu studieren. Aber seit ich arbeite, hat sich die Zeit fürs Malen irgendwie nicht mehr angefunden. Jetzt stell ich mir mein Tagebuch kombiniert mit meinen Skizzen vor. Das wird so großartig!!

Wie verbringt ihr denn euer Wochenende?, xo Diana