a collections of methods
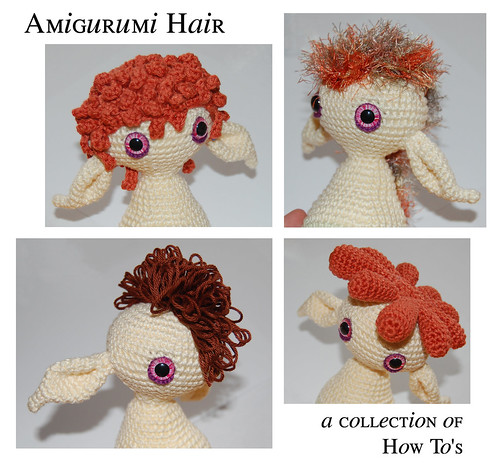
There are alot of ways to create doll hair. You can crochet every single hair at a time, you can use fun fur and receive hair very quickly. You can embroider a nice hairstyle to your dolls head. You also could knot hair by hair to the head or make a fringe and start from this to have full hair that's blowing in the wind.
This tutorial will show all ways I know of and explain how you can create them. Therefore I sorted the single parts of this tutorial like this: fun fur hair, crocheted hairstyles, embroidered haircuts and fringe style hair.
FUN FUR HAIR
Until now I preferred fun fur or fuzzy yarn to give a doll some hair. It's very fast and looks very full.
For some real good tips on working with fuzzy yarn I would like to link to June of
PlanetJune, she shares some real good
information on fuzzy yarns.
I also would like to add one more tip: use a hook that's big enough. This helps alot seeing your stitches and it's not necessary to crochet tight when you want to make hair.
You can crochet simply in the round, like you would when making the head of your doll, increase for as many rows as necessary but don't get a bigger circumfarance than the dolls head. Now go from here and crochtet a few more rows without increasing. You receive a wig or a furry cap that you can use as hair.
you also can create other styles like a Mohawk haircut (I use this alot for my trolls, a Mohawk suits best for trolls I think ^_^)
 The directions for this are
:
1 -- chain 25
2 -- start in 3rd stitch from hook: make a double crochet (dc), make a dc in next st, triple crochet (tc) into the next 4 sts, dc into the next 5 sts, single crochet (sc) into next 12 sts
3 -- continue on other side of starting chain: sc 12 times, dc 5 times, tc 4 times, dc into next 2 sts and end with a slipstitch
Bind Off
cut your yarn and leave a quite long yarn end
To cut a long yarn end is a good tip for every hairstyle, this way you can use the yarn end to sew the hair to the head and don't need to add extra yarn (extra yarn means extra ends to weave in)
crocheted hairstyles
To crochet a haircut is as easy as to crochet your doll. You can use the same type of yarn you used for your doll and of course the same hook. You can crochet Ponytails or piggy tails like in this picture from the talented May (check out
Isabelle and her
flickr profile: pureEva).
Above is a picture of the style I just made, something that should look like thick curled hair, a little bit rasta style - maybe it reminds some of you of Carl, Jimmy Neutrons llama-loving friend, cause his hair is what I had in mind when making these:
 When you want to recreate it go like this
:
Edit: dr is a double ring, and m2 stands for a simpl increase: make two sts in oneSIZE A
1 -- make a dr with 5 sts
2 -- m2 x5
3 til 5 -- sc 10 sts
6 -- sc8, sc2tog
7 -- sc7, sc2tog
8 -- sc6, sc2tog
9 -- sc5, sc2tog
SIZE B
1 -- make a dr with 6 sts
2 -- m2 x6
3 til 4 -- sc 12 sts
5 -- sc10, sc2tog
6 -- sc9, sc2tog
7 -- sc8, sc2tog
8 -- sc7, sc2tog
9 -- sc6, sc2tog
10 -- sc5, sc2tog
SIZE C
1 -- make a dr with 8 sts
2 -- m2 x8
3 til 4 -- sc 16 sts
5 -- sc14, sc2tog
6 -- sc13, sc2tog
7 -- sc12, sc2tog
8 -- sc11, sc2tog
9 -- sc10, sc2tog
10 -- sc9, sc2tog
11 -- sc8, sc2tog
12 -- sc7, sc2tog
13 -- sc6, sc2tog
I made 3xA, 4xB, 2xC and sorted like this: C-B-C-B-A-A-B-A-B
after I've joined everything I crocheted in the round and decreased: (
sc2tog, sc1) * for the first row, and
sc2tog all sts of last row, bind off and leave a long yarn tail, hide all yarn ends of the single "hair curls" and use the long tail to sew it to the head.
You might like to stuff the single "hair curls", if you don't they would form a little closer to the head.
When crochting you can also make
curly hair by adding bobbles as you go: start like you would for making the head of your doll and add bobbles as you go, every few stitches in more acurate way (every second row every 2nd st for example) or wherever it fits and you would like your bobble to be.
Another way for curly hair would be to add chained stitches:
Above you also can see my troll with a short haired curly wig.
To make something like this:
1 -- start just like for a regular doll head
2 -- creating a hair: chain 6 sts, and starting in 2nd stitch from hook sc into the next 5 sts.
3 -- go on with the pattern of yourdolls head
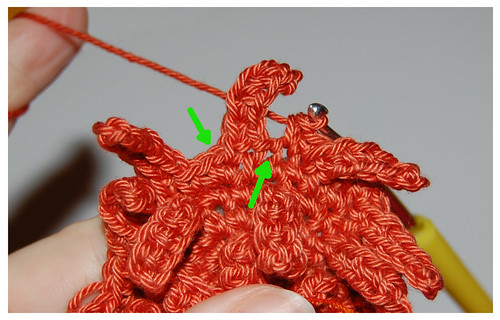
for this short haired version I made "hair" every 3 sts and every 2nd row. The row inbetween two "hair-rows" was very helpful to keep track of my sts. See the picture below for understanding the first stitch after a hair and the last stitch before a hair (green arrows). When you crochet around a hair take care that you hold the "hair" away from you, behind your yarn and hook.

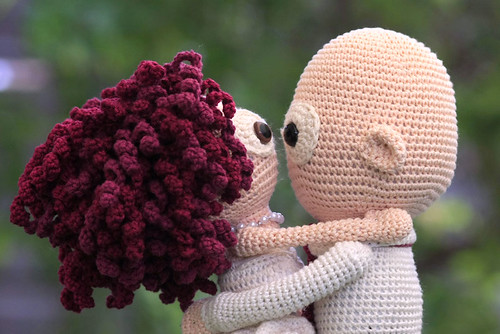
When you elongate the chains they start curling automatically and might look like the hair of this beautiful bride, created by the lovely Adi (see her profile at flickr:
slipstich)

Adi also added that she made this couple for her sister's wedding invitation. Since she has lots of curly hair it took her almost a week to crochet the hair. The rest of the doll took 3 days....
And these acurate curling curls were made a little bit different than mine:
Each curl is made of two rows:
1 -- chain 30 (more or less, depending on location)
2 -- 2x hdc in every second ch.
One more word on the width: never become bigger than the size of your dolls head. The wig / cap will stretch and therefore fit your doll. If you're not sure test the size as you go as often as you like. You might like to loosen your tension a little to be absolutely sure your hair will fit your dolls head.
embroidered haircutswhen you like embroidering you might like to prefer this method. It creates very neat and realistic hairstyles. You can add different colored spots to add even more reality to this dolls head.

Have a look at the beautiful dolls made by
Mia (ravelry link). She also has written up a
very detailed and informative tutorial on how you can create this type of hair. I couldn't do any better so have a look at this
great tutorial.
fringe style hair
to make a fringe is a fantastic way to have really long hair, hair that you even could comb.
There are three ways to add hair like this: one would be a
crocheted frindge (when making a new stitch hold a loop with your finger and continue to crochet). This works just like written above, you start like for a doll head and crochet in the round until your wig is finished. But there's a rub in it. I would not cut these fringes, they might come off too easily.
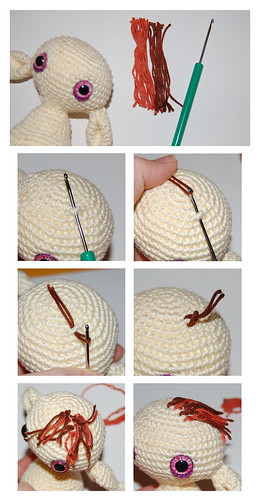
Another way is to add hair by hair:
knotting. Knotting can create very long hair, since you cut your desired hair length before adding it to the head
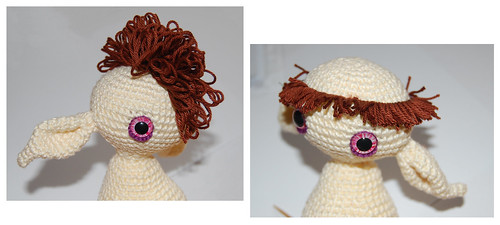
Here's just a little example of how it might look. You can cut it and I think (I don't have long time experience with it) that a pure wool yarn might be better, it could felt a little and help keeping the single pieces of hair in place.
step by step pics:

Making a
fringe with a lace loom is a real cool way that creates great hair for shorter hair cuts. Christen of Creepy Cute Crochet has written up a
very handy tutorial for making a fringe with a lace loom.
I've tried it with a piece of card bord which I cutted to the size I wanted and it works very well:

I hope I added everything that's worth mentioning.