10/31/2008

a day off with flowers

this morning I switched through to CNN news when they were talking about the snow in germany - as I told you yesterday it's winter now, and the fact that CNN was talking about it makes it only more freezy.
It didn't snow around my area (at the baltic sea there is snow very rare) but it was stormy and rainy and this kind of weather is creeping into your clothes, not like snow which you can enjoy and have fun with . . .

but today is Reformationstag (thanks to Martin Luther, not the "king" but the monk), which means I have a day off and can stay at home, that I don't need to go outside to check how cold it is and it also means I have a whole day of relaxing, crocheting and eating ^__^


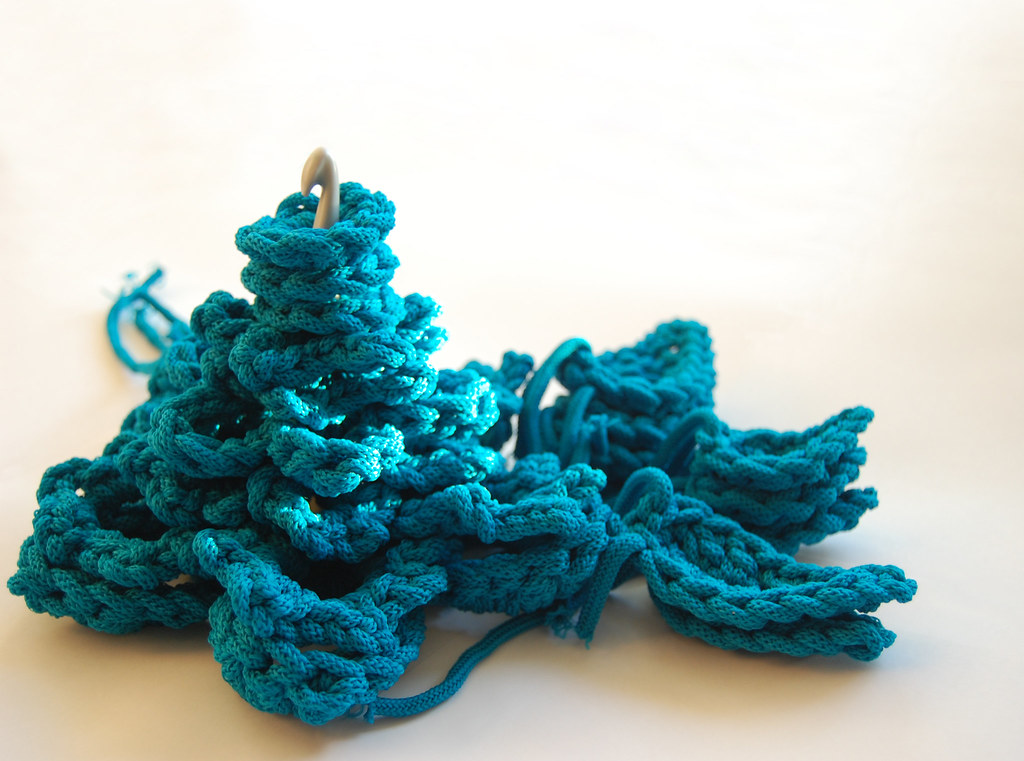
and I have a nice project I can show you - tatata - my new bath mat!
I like the teal color and I like the idea that it's made of flowers. And I like the fact that it's made with a 10 mm hook

so long, for those who have a day off Happy Reformationstag and all you others Happy Halloween

10/30/2008

fall is over


yepp, it's officially winter, my wardobe will turn winter!.
Today has been the first day that has been really freezing cold: rainy, stormy and only 4°C
that's bitterly cold and definitly too cold for my "normal" clothes, so be aware winter I'm preparing!


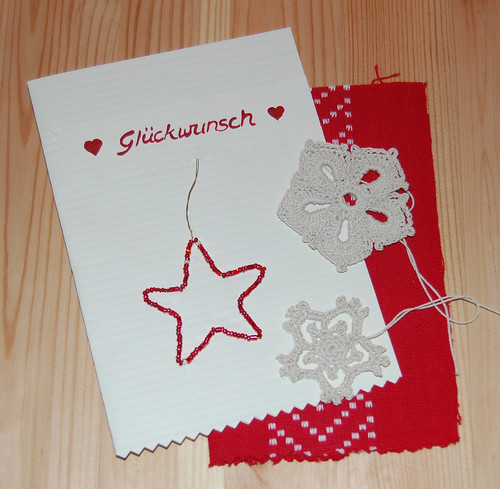
And I've also received my first winter greetings in the post today.


aren't these stars lovely? I guessed correctly when Katrin of marsupialia was asking what she was making (a christmas calender). Katrin and Barbara are starting a new buissness and just started a blog (so there wasn't that much competition, ^_^ but hey I won, that's all that counts ^_^ )

They providing the pattern for the little star at their blog, it's very cute and easy to make.
You also should check out a bit of their stuff, they want to open a store for new designers and mainly sell bags, all sorts of (clutches, bigger handbags, messenger, purses, everything; what thrilled me most during the last posts was this one on felt-zipper bags, these are the most creative bags I've ever seen)

Thanks so much Katrin the stars will be decorating my window plants, the straw-like color is gorgeous and will absolutely bring some nice winter feelings to my room (not this freezing cold ugh weather)

10/27/2008

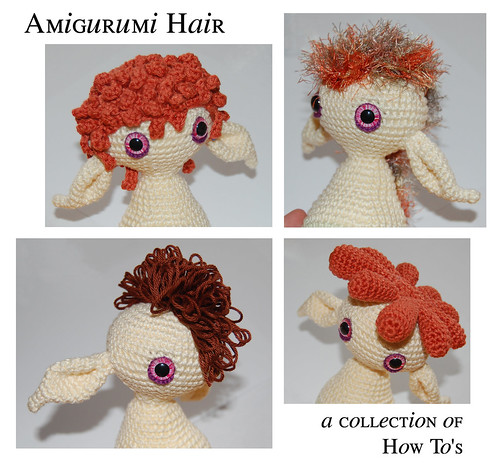
HOW TO - amigurumi hair

a collections of methods

There are alot of ways to create doll hair. You can crochet every single hair at a time, you can use fun fur and receive hair very quickly. You can embroider a nice hairstyle to your dolls head. You also could knot hair by hair to the head or make a fringe and start from this to have full hair that's blowing in the wind.
This tutorial will show all ways I know of and explain how you can create them. Therefore I sorted the single parts of this tutorial like this: fun fur hair, crocheted hairstyles, embroidered haircuts and fringe style hair.


FUN FUR HAIR


Until now I preferred fun fur or fuzzy yarn to give a doll some hair. It's very fast and looks very full.
For some real good tips on working with fuzzy yarn I would like to link to June of PlanetJune, she shares some real good information on fuzzy yarns.
I also would like to add one more tip: use a hook that's big enough. This helps alot seeing your stitches and it's not necessary to crochet tight when you want to make hair.

You can crochet simply in the round, like you would when making the head of your doll, increase for as many rows as necessary but don't get a bigger circumfarance than the dolls head. Now go from here and crochtet a few more rows without increasing. You receive a wig or a furry cap that you can use as hair.

you also can create other styles like a Mohawk haircut (I use this alot for my trolls, a Mohawk suits best for trolls I think ^_^)


The directions for this are:
1 -- chain 25
2 -- start in 3rd stitch from hook: make a double crochet (dc), make a dc in next st, triple crochet (tc) into the next 4 sts, dc into the next 5 sts, single crochet (sc) into next 12 sts
3 -- continue on other side of starting chain: sc 12 times, dc 5 times, tc 4 times, dc into next 2 sts and end with a slipstitch
Bind Off

cut your yarn and leave a quite long yarn end

To cut a long yarn end is a good tip for every hairstyle, this way you can use the yarn end to sew the hair to the head and don't need to add extra yarn (extra yarn means extra ends to weave in)


crocheted hairstyles


To crochet a haircut is as easy as to crochet your doll. You can use the same type of yarn you used for your doll and of course the same hook. You can crochet Ponytails or piggy tails like in this picture from the talented May (check out Isabelle and her flickr profile: pureEva).

Above is a picture of the style I just made, something that should look like thick curled hair, a little bit rasta style - maybe it reminds some of you of Carl, Jimmy Neutrons llama-loving friend, cause his hair is what I had in mind when making these:


When you want to recreate it go like this:

Edit: dr is a double ring, and m2 stands for a simpl increase: make two sts in one

SIZE A
1 -- make a dr with 5 sts
2 -- m2 x5
3 til 5 -- sc 10 sts
6 -- sc8, sc2tog
7 -- sc7, sc2tog
8 -- sc6, sc2tog
9 -- sc5, sc2tog

SIZE B
1 -- make a dr with 6 sts
2 -- m2 x6
3 til 4 -- sc 12 sts
5 -- sc10, sc2tog
6 -- sc9, sc2tog
7 -- sc8, sc2tog
8 -- sc7, sc2tog
9 -- sc6, sc2tog
10 -- sc5, sc2tog

SIZE C
1 -- make a dr with 8 sts
2 -- m2 x8
3 til 4 -- sc 16 sts
5 -- sc14, sc2tog
6 -- sc13, sc2tog
7 -- sc12, sc2tog
8 -- sc11, sc2tog
9 -- sc10, sc2tog
10 -- sc9, sc2tog
11 -- sc8, sc2tog
12 -- sc7, sc2tog
13 -- sc6, sc2tog

I made 3xA, 4xB, 2xC and sorted like this: C-B-C-B-A-A-B-A-B

after I've joined everything I crocheted in the round and decreased: (sc2tog, sc1) * for the first row, and sc2tog all sts of last row, bind off and leave a long yarn tail, hide all yarn ends of the single "hair curls" and use the long tail to sew it to the head.
You might like to stuff the single "hair curls", if you don't they would form a little closer to the head.

When crochting you can also make curly hair by adding bobbles as you go: start like you would for making the head of your doll and add bobbles as you go, every few stitches in more acurate way (every second row every 2nd st for example) or wherever it fits and you would like your bobble to be.

Another way for curly hair would be to add chained stitches:

Above you also can see my troll with a short haired curly wig.

To make something like this:

1 -- start just like for a regular doll head
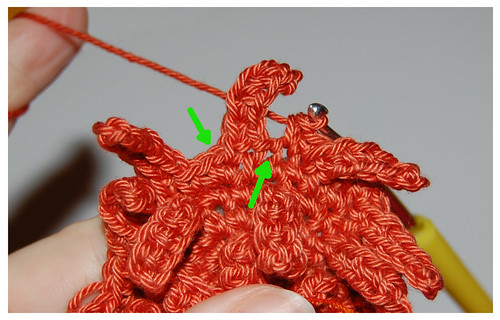
2 -- creating a hair: chain 6 sts, and starting in 2nd stitch from hook sc into the next 5 sts.
3 -- go on with the pattern of yourdolls head

for this short haired version I made "hair" every 3 sts and every 2nd row. The row inbetween two "hair-rows" was very helpful to keep track of my sts. See the picture below for understanding the first stitch after a hair and the last stitch before a hair (green arrows). When you crochet around a hair take care that you hold the "hair" away from you, behind your yarn and hook.


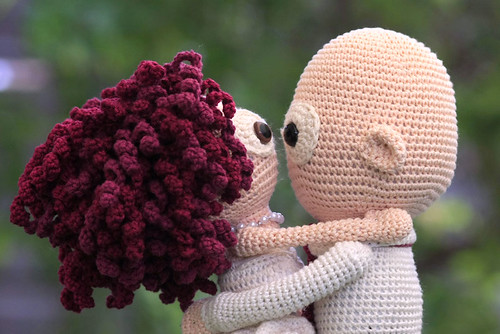
When you elongate the chains they start curling automatically and might look like the hair of this beautiful bride, created by the lovely Adi (see her profile at flickr: slipstich)


Adi also added that she made this couple for her sister's wedding invitation. Since she has lots of curly hair it took her almost a week to crochet the hair. The rest of the doll took 3 days....
And these acurate curling curls were made a little bit different than mine:

Each curl is made of two rows:

1 -- chain 30 (more or less, depending on location)
2 -- 2x hdc in every second ch.

One more word on the width: never become bigger than the size of your dolls head. The wig / cap will stretch and therefore fit your doll. If you're not sure test the size as you go as often as you like. You might like to loosen your tension a little to be absolutely sure your hair will fit your dolls head.


embroidered haircuts

when you like embroidering you might like to prefer this method. It creates very neat and realistic hairstyles. You can add different colored spots to add even more reality to this dolls head.


Have a look at the beautiful dolls made by Mia (ravelry link). She also has written up a very detailed and informative tutorial on how you can create this type of hair. I couldn't do any better so have a look at this great tutorial.


fringe style hair


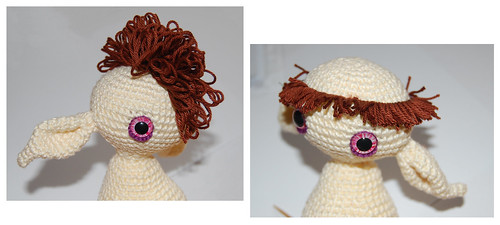
to make a fringe is a fantastic way to have really long hair, hair that you even could comb.

There are three ways to add hair like this: one would be a crocheted frindge (when making a new stitch hold a loop with your finger and continue to crochet). This works just like written above, you start like for a doll head and crochet in the round until your wig is finished. But there's a rub in it. I would not cut these fringes, they might come off too easily.

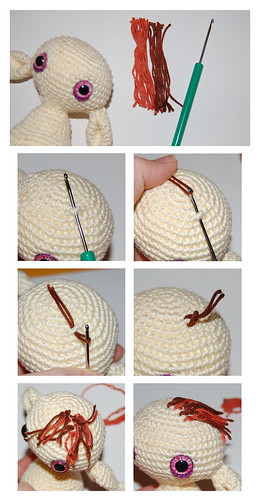
Another way is to add hair by hair: knotting. Knotting can create very long hair, since you cut your desired hair length before adding it to the head

Here's just a little example of how it might look. You can cut it and I think (I don't have long time experience with it) that a pure wool yarn might be better, it could felt a little and help keeping the single pieces of hair in place.

step by step pics:


Making a fringe with a lace loom is a real cool way that creates great hair for shorter hair cuts. Christen of Creepy Cute Crochet has written up a very handy tutorial for making a fringe with a lace loom.
I've tried it with a piece of card bord which I cutted to the size I wanted and it works very well:


_________________________________

I hope I added everything that's worth mentioning.
Many thanks to June, May, Adi, Mia and Christen

_________________________________

Please see my flickr pics on this tutorial for the big pictures

10/23/2008

happy 50th birthday


the smurfs first aired on october 23rd in 1958


happy 50th birthday

crochet on the edge


I just got hom from work and found a little note from my postman: I left a package at your neighbours

yeah-hey, my new external hard drive arrived. And with it came the fantastic book crochet on the edge by Nicky Epstein (I figured the hard drive was expensive enough and another book or two won't make my bill to big, I might not even realize), It's my first Nicky Epstein book and regarding how cool it is I'm surely gonna get me some more.


This book is awesome, it has really a lot of different stitches you can use for borders or so many other stuff, the single stitches are a great completion of my stitch library. I haven't tested any pattern so far but it looks like they are all well written. There are about 6 patterns in there and two of them will make it into my wardrobe, I've never had a book before that made me make 30 percent of the patterns in there - I'm really thrilled.


Which is not that thrilling is the fact that I just found out I need to work this weekend. I wanted to post my next tutorial this weekend. It's gonna be pretty picture heavy, since it's about amigurumi hair and there is lot to say about hair for amigurumis, there are quite a few different ways to create it and all will give you a real good tool to make the best out of every doll you create. But that's it for now, I hope to find the time to post this weekend but if not it will appear here at tuesday at the latest.

10/18/2008

HOW TO - amigurumi eyes

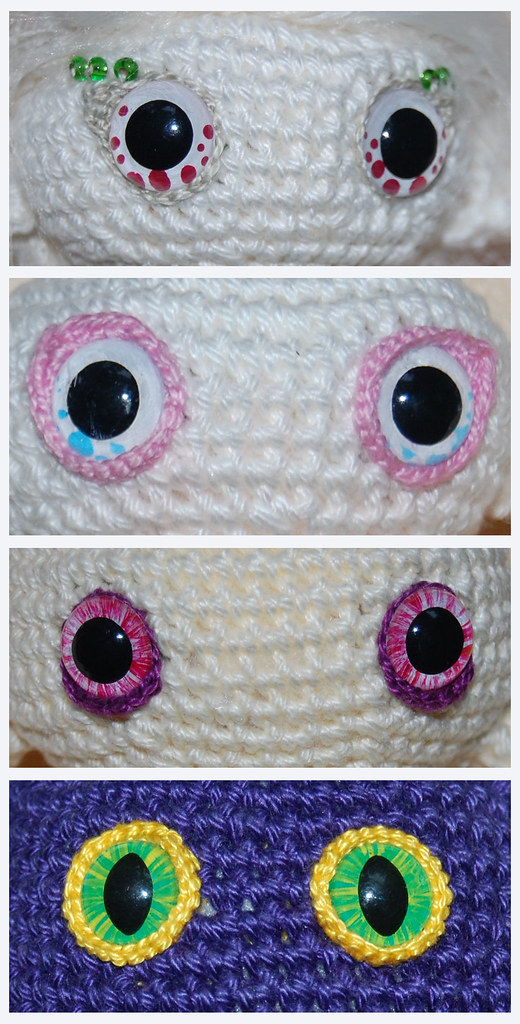
So today everything will be about eyes, sparkling eyes. Eyes like these?


A lot of you have asked me where I get my eyes from and I always needed to say that I make them myself, today I show you how I made them.

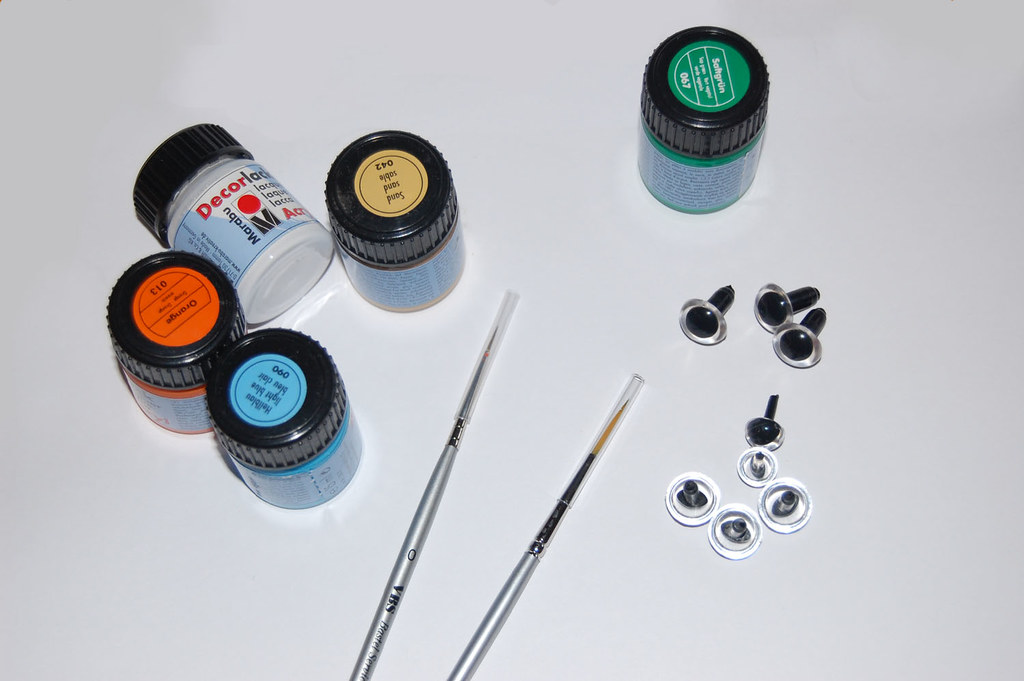
What you need
safety eyes, acrylic lacquer and super fine brushes


I have loads of simple clear safety eyes, in two different sizes and two different shaped pupils (round and birdishly convex), just enough to have a fitting starting lens for every doll I make. (although I find I most often use the bigger and round shaped eyes)

When you choose the best lacquer take care of solvent and the ground your lacquer is best for (there are special lacquers for a lot of surfaces)
I chose water-based acrylic gloss lacquer that's weatherproof and saliva-resitant (this is pretty important if you make dolls that little children might play with, although I would recommend to crochet eyes and pupils for toddlers instead of plastic ones)
I also dind't buy all sorts of different colors - just a base so I can mix every shade and color I wish for.

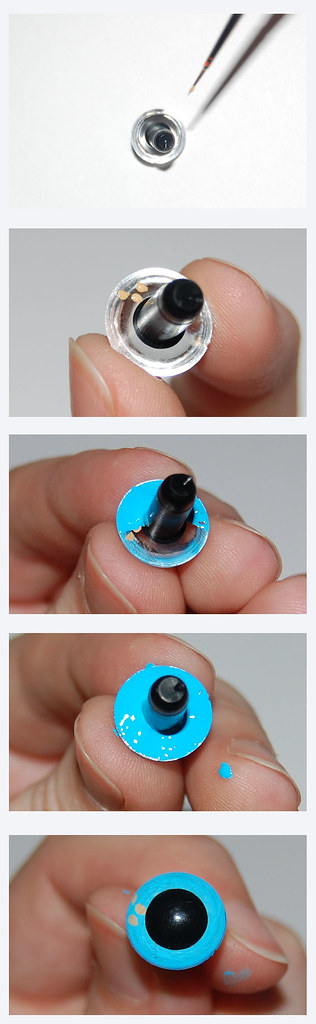
step by step

first choose your colors (of course =^_^=)
then decide on the look you want to give your doll, never forget: The eyes are the window of the soul!


start drawing little details onto the back of your safety eyes, it's a little tricky because of the small size but use the stem to have a little control.
Make little dots or small lines to create a real looking pupil. Dots will create a sparkling effect, dreamy eyes.

Now wait. Wait until the color is completly dry, this can take up to a few hours, it depends on the lacquer you choose and the thickness of the layer of paint.

And when everything is dry add a second layer that covers every millimeter of the back of the eyes. And wait again, this will take longer than before (best you let them dry overnight; I once couldn't wait and screw up a whole doll)

et voila, add to a doll face and enjoy


EXTRA TIP
- take care that your eyes mirror each other (in case you create different sized dots for example)
- repairing mistakes is easy when the paint is still wet, you can rub it away with a simple hanky
- before you try nail polish remover to repair bigger mistakes TEST it on an eye, it might destroy the surface of your plastic eyes
- CLEAN your brushes immediately and thoroughly (lacquer can be very resistant once it's dry and brushes might never become soft again)

10/14/2008

HOW TO shape and decrease invisibly

This tutorial is more a collection of some information to make the best of your amigurumis than a real tutorial that explains a certain technique.

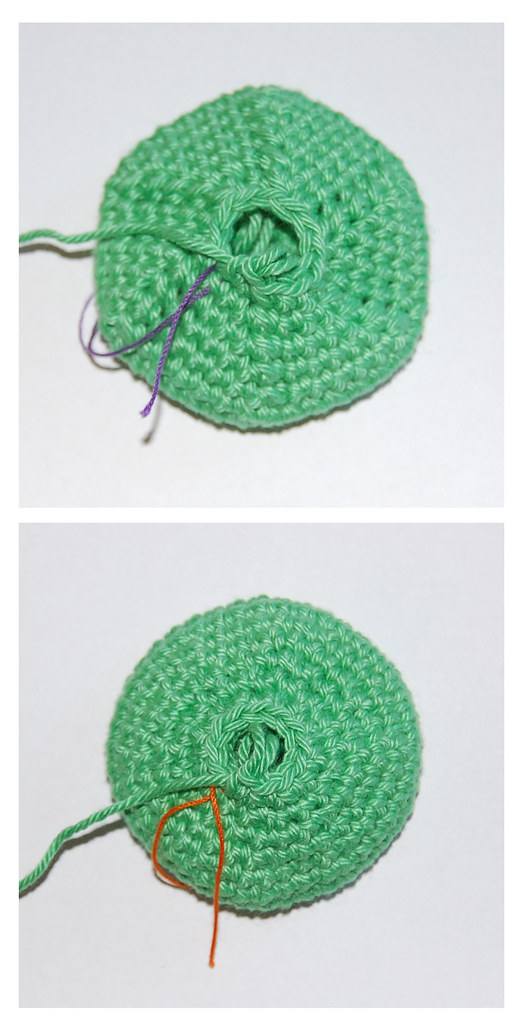
But before we start let me show you the classical version (top) and the improved version (bottom) of a simple round shape.

increases

decreases

You can easily see that the classical version starts to form to a hexagon whilst the improved version is more round. It's a simple but very effective trick that creates this result:

Shaping

Shaping ends with stuffing your doll. With a good stuffing you can give your doll the final form and even smooth out little mistakes.
But shaping also starts within the crocheting process itself!

A lot of patterns give information like
- increase 6 sts and spread evenly
or
- increase 6 evenly spaced
or
- *2sc in first sc, 1sc in next sts, repeat from * around

so you often will increase one stitch at the beginning of every 'increasing interval' and therefore all your increases will be on top of each other.
There is nothing wrong with this, especially at smaller diameters like we often find when making dolls. But the bigger your diameter gets the more the hexagonal form will want to show off and stuffing will no longer be a solution. Therefore it's a good trick to alternate increasing intervals. In uneven rows start with the increasing as usual, but at even rows make increases in the middle of every section.

example:
uneven rows: (make 2 sc in first st, x number of sc) repeat six times around
even rows: x/2 number of sts, (make 2 sc into next st, x number of sts) repeat 5 times, make 2 sc into next st, x/2 number of sts

so in uneven rounds, you more or less only divide one increasing section and make a certain number of sc before you start increasing. This way you will have 12 sections instead of 6 and your hexagonal form will become rounder.

This also works great for the decreasing of a round shape.

Decreasing invisibly

Decreasing most often is done with pushing and pulling your hook through the next two sts one after the other, yarning over as you do so, and finally drawing the yarn through all three loops on the hook:


you will end up with one stitch instead of two - you decreased one stitch. If you click on the picture above you can see more details but also you can see that the decreased stitch is easily recognised: the loops lean to the left.
When you compare the two pictures of the decreases in the classical and improved version (above) you can also see that making decreases on top of each other makes them recognizable even more easily - so try to avoid this like described under shaping.

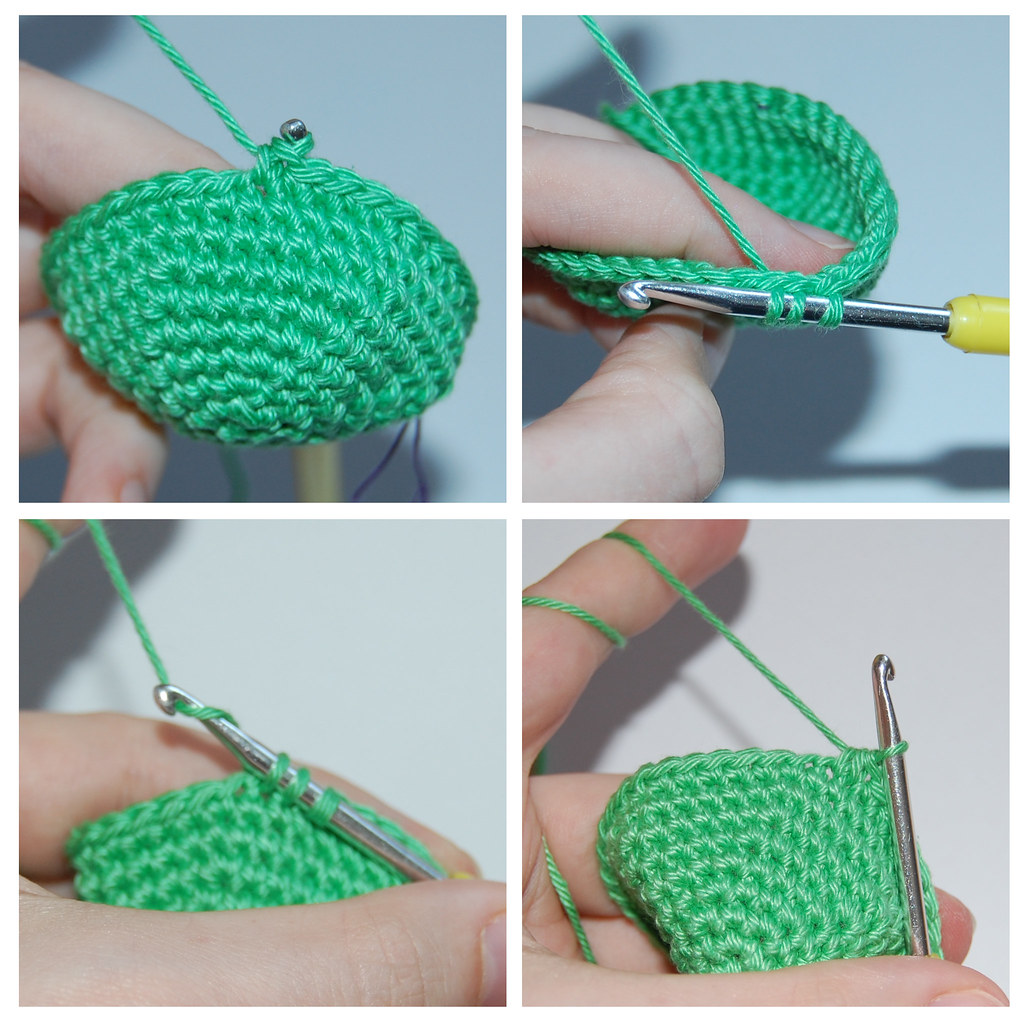
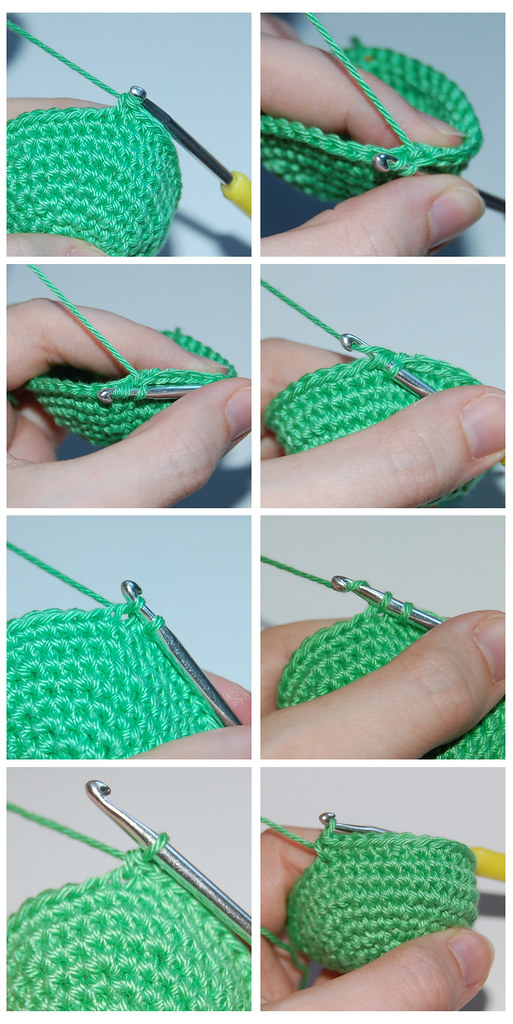
The next series of pictures illusrates how to decrease a stitch and don't have anybody recognize it.


1 - before you started a decrease
2 - push your hook through the front loop of the next stitch
3 - push your hoop through the front loop of the next but one stitch as well
4 - yarn over
5 - pull yarn through the first two loops on hook
6 - yarn over again
7 - pull yarn through all loops on hook (two)
8 - decreased stitch (right in the middle of picture, 5 sts from hook end)

you can hardly see the decrease at all, isn't that great?