10/23/2008
crochet on the edge
I just got hom from work and found a little note from my postman: I left a package at your neighbours
yeah-hey, my new external hard drive arrived. And with it came the fantastic book crochet on the edge by Nicky Epstein (I figured the hard drive was expensive enough and another book or two won't make my bill to big, I might not even realize), It's my first Nicky Epstein book and regarding how cool it is I'm surely gonna get me some more.

This book is awesome, it has really a lot of different stitches you can use for borders or so many other stuff, the single stitches are a great completion of my stitch library. I haven't tested any pattern so far but it looks like they are all well written. There are about 6 patterns in there and two of them will make it into my wardrobe, I've never had a book before that made me make 30 percent of the patterns in there - I'm really thrilled.
Which is not that thrilling is the fact that I just found out I need to work this weekend. I wanted to post my next tutorial this weekend. It's gonna be pretty picture heavy, since it's about amigurumi hair and there is lot to say about hair for amigurumis, there are quite a few different ways to create it and all will give you a real good tool to make the best out of every doll you create. But that's it for now, I hope to find the time to post this weekend but if not it will appear here at tuesday at the latest.
10/18/2008
HOW TO - amigurumi eyes
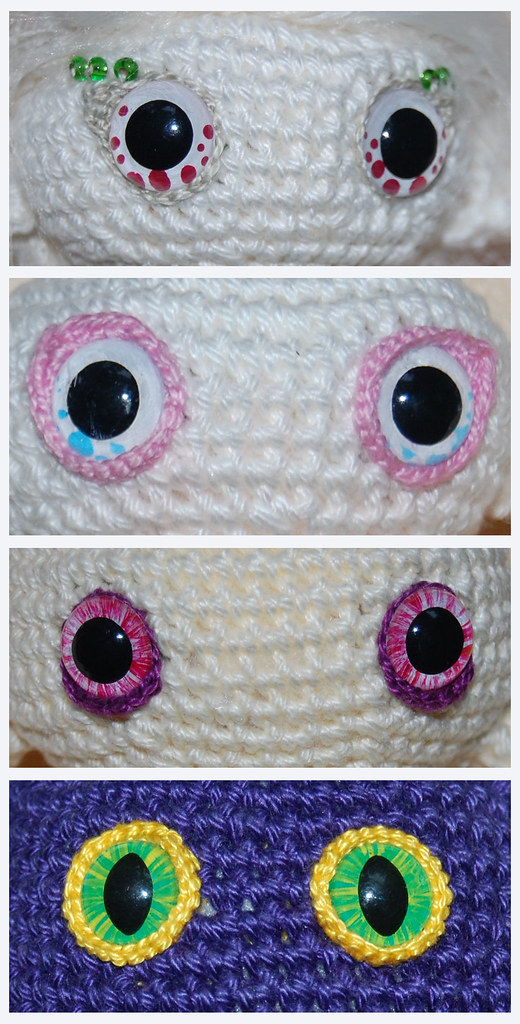
So today everything will be about eyes, sparkling eyes. Eyes like these?

A lot of you have asked me where I get my eyes from and I always needed to say that I make them myself, today I show you how I made them.
What you need
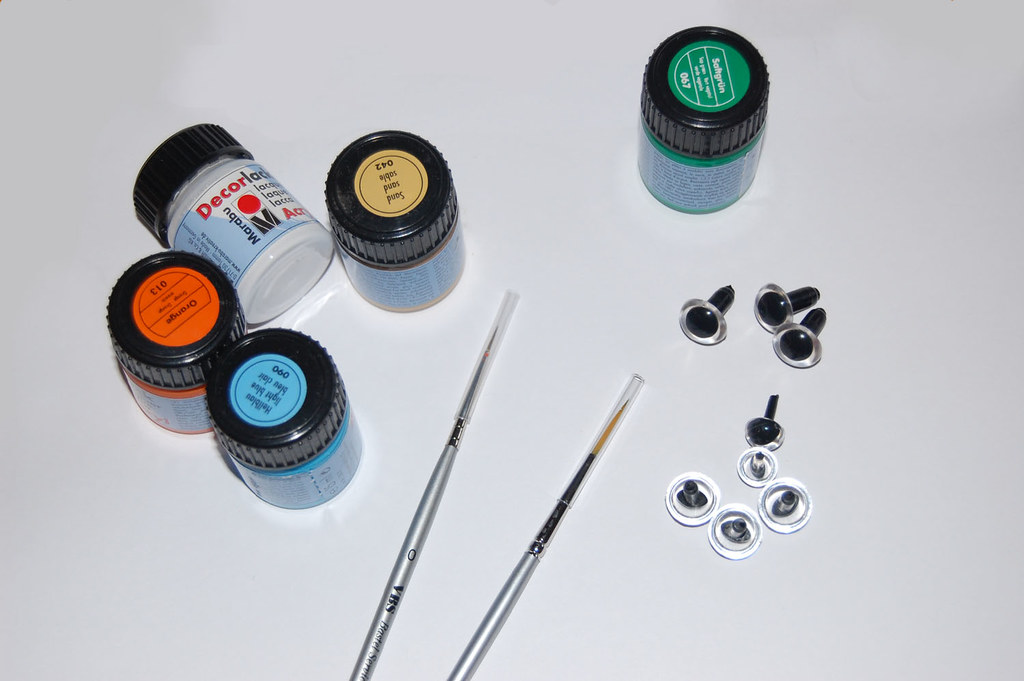
safety eyes, acrylic lacquer and super fine brushes

I have loads of simple clear safety eyes, in two different sizes and two different shaped pupils (round and birdishly convex), just enough to have a fitting starting lens for every doll I make. (although I find I most often use the bigger and round shaped eyes)
When you choose the best lacquer take care of solvent and the ground your lacquer is best for (there are special lacquers for a lot of surfaces)
I chose water-based acrylic gloss lacquer that's weatherproof and saliva-resitant (this is pretty important if you make dolls that little children might play with, although I would recommend to crochet eyes and pupils for toddlers instead of plastic ones)
I also dind't buy all sorts of different colors - just a base so I can mix every shade and color I wish for.
step by step
first choose your colors (of course =^_^=)
then decide on the look you want to give your doll, never forget: The eyes are the window of the soul!

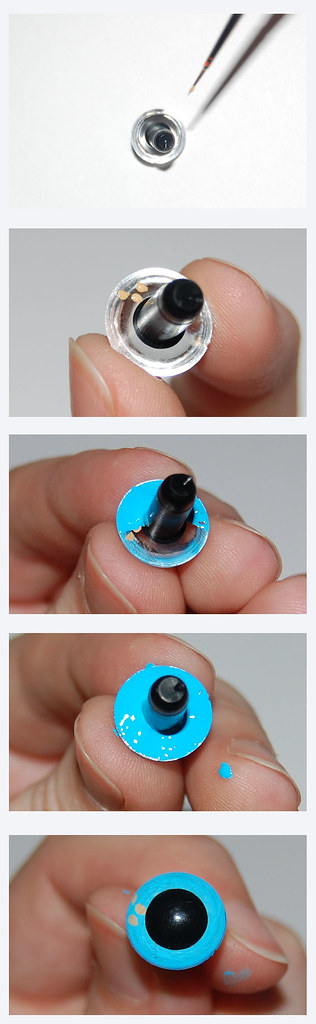
start drawing little details onto the back of your safety eyes, it's a little tricky because of the small size but use the stem to have a little control.
Make little dots or small lines to create a real looking pupil. Dots will create a sparkling effect, dreamy eyes.
Now wait. Wait until the color is completly dry, this can take up to a few hours, it depends on the lacquer you choose and the thickness of the layer of paint.
And when everything is dry add a second layer that covers every millimeter of the back of the eyes. And wait again, this will take longer than before (best you let them dry overnight; I once couldn't wait and screw up a whole doll)
et voila, add to a doll face and enjoy
EXTRA TIP
- take care that your eyes mirror each other (in case you create different sized dots for example)
- repairing mistakes is easy when the paint is still wet, you can rub it away with a simple hanky
- before you try nail polish remover to repair bigger mistakes TEST it on an eye, it might destroy the surface of your plastic eyes
- CLEAN your brushes immediately and thoroughly (lacquer can be very resistant once it's dry and brushes might never become soft again)
A lot of you have asked me where I get my eyes from and I always needed to say that I make them myself, today I show you how I made them.
What you need
safety eyes, acrylic lacquer and super fine brushes
I have loads of simple clear safety eyes, in two different sizes and two different shaped pupils (round and birdishly convex), just enough to have a fitting starting lens for every doll I make. (although I find I most often use the bigger and round shaped eyes)
When you choose the best lacquer take care of solvent and the ground your lacquer is best for (there are special lacquers for a lot of surfaces)
I chose water-based acrylic gloss lacquer that's weatherproof and saliva-resitant (this is pretty important if you make dolls that little children might play with, although I would recommend to crochet eyes and pupils for toddlers instead of plastic ones)
I also dind't buy all sorts of different colors - just a base so I can mix every shade and color I wish for.
step by step
first choose your colors (of course =^_^=)
then decide on the look you want to give your doll, never forget: The eyes are the window of the soul!
start drawing little details onto the back of your safety eyes, it's a little tricky because of the small size but use the stem to have a little control.
Make little dots or small lines to create a real looking pupil. Dots will create a sparkling effect, dreamy eyes.
Now wait. Wait until the color is completly dry, this can take up to a few hours, it depends on the lacquer you choose and the thickness of the layer of paint.
And when everything is dry add a second layer that covers every millimeter of the back of the eyes. And wait again, this will take longer than before (best you let them dry overnight; I once couldn't wait and screw up a whole doll)
et voila, add to a doll face and enjoy
EXTRA TIP
- take care that your eyes mirror each other (in case you create different sized dots for example)
- repairing mistakes is easy when the paint is still wet, you can rub it away with a simple hanky
- before you try nail polish remover to repair bigger mistakes TEST it on an eye, it might destroy the surface of your plastic eyes
- CLEAN your brushes immediately and thoroughly (lacquer can be very resistant once it's dry and brushes might never become soft again)
10/14/2008
HOW TO shape and decrease invisibly
This tutorial is more a collection of some information to make the best of your amigurumis than a real tutorial that explains a certain technique.
But before we start let me show you the classical version (top) and the improved version (bottom) of a simple round shape.
increases

decreases

You can easily see that the classical version starts to form to a hexagon whilst the improved version is more round. It's a simple but very effective trick that creates this result:
Shaping
Shaping ends with stuffing your doll. With a good stuffing you can give your doll the final form and even smooth out little mistakes.
But shaping also starts within the crocheting process itself!
A lot of patterns give information like
- increase 6 sts and spread evenly
or
- increase 6 evenly spaced
or
- *2sc in first sc, 1sc in next sts, repeat from * around
so you often will increase one stitch at the beginning of every 'increasing interval' and therefore all your increases will be on top of each other.
There is nothing wrong with this, especially at smaller diameters like we often find when making dolls. But the bigger your diameter gets the more the hexagonal form will want to show off and stuffing will no longer be a solution. Therefore it's a good trick to alternate increasing intervals. In uneven rows start with the increasing as usual, but at even rows make increases in the middle of every section.
example:
uneven rows: (make 2 sc in first st, x number of sc) repeat six times around
even rows: x/2 number of sts, (make 2 sc into next st, x number of sts) repeat 5 times, make 2 sc into next st, x/2 number of sts
so in uneven rounds, you more or less only divide one increasing section and make a certain number of sc before you start increasing. This way you will have 12 sections instead of 6 and your hexagonal form will become rounder.
This also works great for the decreasing of a round shape.
Decreasing invisibly
Decreasing most often is done with pushing and pulling your hook through the next two sts one after the other, yarning over as you do so, and finally drawing the yarn through all three loops on the hook:

you will end up with one stitch instead of two - you decreased one stitch. If you click on the picture above you can see more details but also you can see that the decreased stitch is easily recognised: the loops lean to the left.
When you compare the two pictures of the decreases in the classical and improved version (above) you can also see that making decreases on top of each other makes them recognizable even more easily - so try to avoid this like described under shaping.
The next series of pictures illusrates how to decrease a stitch and don't have anybody recognize it.

1 - before you started a decrease
2 - push your hook through the front loop of the next stitch
3 - push your hoop through the front loop of the next but one stitch as well
4 - yarn over
5 - pull yarn through the first two loops on hook
6 - yarn over again
7 - pull yarn through all loops on hook (two)
8 - decreased stitch (right in the middle of picture, 5 sts from hook end)
you can hardly see the decrease at all, isn't that great?
But before we start let me show you the classical version (top) and the improved version (bottom) of a simple round shape.
increases
decreases
You can easily see that the classical version starts to form to a hexagon whilst the improved version is more round. It's a simple but very effective trick that creates this result:
Shaping
Shaping ends with stuffing your doll. With a good stuffing you can give your doll the final form and even smooth out little mistakes.
But shaping also starts within the crocheting process itself!
A lot of patterns give information like
- increase 6 sts and spread evenly
or
- increase 6 evenly spaced
or
- *2sc in first sc, 1sc in next sts, repeat from * around
so you often will increase one stitch at the beginning of every 'increasing interval' and therefore all your increases will be on top of each other.
There is nothing wrong with this, especially at smaller diameters like we often find when making dolls. But the bigger your diameter gets the more the hexagonal form will want to show off and stuffing will no longer be a solution. Therefore it's a good trick to alternate increasing intervals. In uneven rows start with the increasing as usual, but at even rows make increases in the middle of every section.
example:
uneven rows: (make 2 sc in first st, x number of sc) repeat six times around
even rows: x/2 number of sts, (make 2 sc into next st, x number of sts) repeat 5 times, make 2 sc into next st, x/2 number of sts
so in uneven rounds, you more or less only divide one increasing section and make a certain number of sc before you start increasing. This way you will have 12 sections instead of 6 and your hexagonal form will become rounder.
This also works great for the decreasing of a round shape.
Decreasing invisibly
Decreasing most often is done with pushing and pulling your hook through the next two sts one after the other, yarning over as you do so, and finally drawing the yarn through all three loops on the hook:
you will end up with one stitch instead of two - you decreased one stitch. If you click on the picture above you can see more details but also you can see that the decreased stitch is easily recognised: the loops lean to the left.
When you compare the two pictures of the decreases in the classical and improved version (above) you can also see that making decreases on top of each other makes them recognizable even more easily - so try to avoid this like described under shaping.
The next series of pictures illusrates how to decrease a stitch and don't have anybody recognize it.
1 - before you started a decrease
2 - push your hook through the front loop of the next stitch
3 - push your hoop through the front loop of the next but one stitch as well
4 - yarn over
5 - pull yarn through the first two loops on hook
6 - yarn over again
7 - pull yarn through all loops on hook (two)
8 - decreased stitch (right in the middle of picture, 5 sts from hook end)
you can hardly see the decrease at all, isn't that great?
10/10/2008
friday sun
today was the most bestest day in a long time, so good I even forgot my english =^_^=
no really, I needed to go to "the other lab" for work today and was finished pretty early so I decided to use the great weather and go to the beach today, why not enjoying the tourist side of this lovely town?
I had ice cream at the beach, had the sunlight in my face (I even got sunburned) and on my walk home I stopped in for buying some delicate chocolate, yummi
(right now I'm drinking some red berries flavoured chocolate - so goooood!)
I'm out of town for the weekend, but already started thinking on the next tutorial, it's gonna show up on the beginning of next week and I think it will be on increasing and decreasing, some tricks for better shaping and how to decrease invisibly.
so long, I leave you with a beautiful picture I found on flickr
the harbour of Warnemünde
isn't it just beautiful? I love to live hear, although today it was alot sunnier =^_^=
10/08/2008
HOW TO start amigurumi
OR
three different ways on beginning crocheting in the round.
When I make an amigurumi I prefer the double ring: it is an advanced solution for the magic adjustable ring, which a lot of sources present as the way to start crocheting in the round - because it's magic, which it is, but the double ring serves a little better for dolls because it's more durable and tight. Another way to begin would be to make a chain, this works great if you can't figure out the adjustable ring methods and for some projects or yarns it actually is a better solution.
In this tutorial I'll present all three versions.
(click on the pictures to enlarge them)
First: Start with a chain
Most crochet projects start with a chain, especially flat projects but it can also be helpful for crocheting in the round.
When you start you first have to make a slip knot. Then you make 2 chain stitches. Now have a look at your mini-chain, the next step will be to make the desired number of single crochet stitches (sc) into the first chain made, or as it is often refered to as: into the second chain from hook.

Many projects start with 6 stitches.
The stability of your first row will depend on the "quality" of your slip knot, e.g. which end of your slip knot will pull the chain or first loop closed.
In the next picture you can see what happens when your working thread is the one that would have made the first chain tighter: it often creates a pretty large center hole that you can't close any more (above). Therefore it's better to start the slip knot in a way that leaves the waste part of your yarn to be the part that will draw the loop closed. The below part of the picture shows a closed and neat center hole.

Now place a stitch marker, as you can see I use thread or pearl yarn to mark my beginning of a round. When I started amigurumi I often used paperclips that I would have hung over my working yarn but I often found that this leaves a noticeable "gap" at the beginning of every round. Thin strong yarn doesn't.
So now that you marked your beginning you can start increasing your project.

Second: Start with the magic adjustable ring
Alot of tutorials on the web show you how to start with the ring by forming a big loop with your hands. This was too complicated for me and I remembered a picture from an old crafts book from my child hood, where you wrap the yarn around your hand one time. To wrap is a lot easier than to form a ring. The only downside to this method is the large amount of waste yarn after you pulled the ring closed - therefore I wrap around my finger!
smaller ring = smaller amount of waste yarn
okay: to start a magic adjustable ring you wrap the yarn around your finger/hand one time. Then carefully take the formed ring off of your finger/hand and adore your little beginning ^_^
Now grab your hook and start crocheting into this ring: the first stitch will resemble more of a pure chain stitch than a single crochet, but after that you can start counting and make as many stitched as called for by your pattern.
What you will have now is something that looks like this:

Now let the magic happen and pull the yarn end and ogle how the loop gets smaller and smaller until the center hole is closed.
Now place your marker and start increasing. The little disadvantage of a magic adjustable ring is the unstiffness: you will need to pull at the waste end again and again.

This isn't a very bad thing for most round projects but for making dolls it's not the best desired way. Dolls get pushed and pulled and squeezed and even washed and slowly the stuffing will come through at your center hole. This problem gets solved with the double ring.
Third: Start with a double ring
As written above the double ring is an advanced solution of a "simple" adjustable ring. The main difference is that you wrap the yarn twice instead of one time around you finger/hand. This way the center hole isn't able to get loose again once it's closed.
After you wrapped twice and carefully took off the created loops and adored them you start crocheting as my sticthes into both loops at once as wished. Now it's time to pull the ring closed. This is a little harder than drawing close a "simple" adjsutable ring. But you don't have to pull as hard at the end of your yarn as possible, this will only break your yarn or even create bad marks at your fingers. There is a little trick:
Pull the yarn end carefully and observe which of the two loops will get smaller (marked yellow).
Now stop pulling the end of the yarn and take the loop that was moving (yellow). Start pulling this loop and observe how the other loop gets drawn tight. When this loop is closed, grab the yarn end again and start tugging, the first loop (the one you just pulled on) will also draw close without any effort.
Tata! a double ring!

Place your marker and start your project. The center hole of a double ring will nerver ever get loose again.
=^_^=
At last let me show you all three versions next to each other:

first the chained version, in the middle the one with the magic adjusatble ring (after a few rows it got looser once more), and on the right side the double ring. The upper part of the picture shows the three methods directly after crocheting, below you can see how they look like after I pulled at the yarn end again and flattend them all out: they don't show much difference but sometimes you can feel it!
Extra TIP
when you use fun fur yarn or other novelty yarns the texture of the yarn will often prevent you from making a double ring. In such cases I am into the chain 2 method of starting a round project.
three different ways on beginning crocheting in the round.
When I make an amigurumi I prefer the double ring: it is an advanced solution for the magic adjustable ring, which a lot of sources present as the way to start crocheting in the round - because it's magic, which it is, but the double ring serves a little better for dolls because it's more durable and tight. Another way to begin would be to make a chain, this works great if you can't figure out the adjustable ring methods and for some projects or yarns it actually is a better solution.
In this tutorial I'll present all three versions.
(click on the pictures to enlarge them)
First: Start with a chain
Most crochet projects start with a chain, especially flat projects but it can also be helpful for crocheting in the round.
When you start you first have to make a slip knot. Then you make 2 chain stitches. Now have a look at your mini-chain, the next step will be to make the desired number of single crochet stitches (sc) into the first chain made, or as it is often refered to as: into the second chain from hook.
Many projects start with 6 stitches.
The stability of your first row will depend on the "quality" of your slip knot, e.g. which end of your slip knot will pull the chain or first loop closed.
In the next picture you can see what happens when your working thread is the one that would have made the first chain tighter: it often creates a pretty large center hole that you can't close any more (above). Therefore it's better to start the slip knot in a way that leaves the waste part of your yarn to be the part that will draw the loop closed. The below part of the picture shows a closed and neat center hole.
Now place a stitch marker, as you can see I use thread or pearl yarn to mark my beginning of a round. When I started amigurumi I often used paperclips that I would have hung over my working yarn but I often found that this leaves a noticeable "gap" at the beginning of every round. Thin strong yarn doesn't.
So now that you marked your beginning you can start increasing your project.
Second: Start with the magic adjustable ring
Alot of tutorials on the web show you how to start with the ring by forming a big loop with your hands. This was too complicated for me and I remembered a picture from an old crafts book from my child hood, where you wrap the yarn around your hand one time. To wrap is a lot easier than to form a ring. The only downside to this method is the large amount of waste yarn after you pulled the ring closed - therefore I wrap around my finger!
smaller ring = smaller amount of waste yarn
okay: to start a magic adjustable ring you wrap the yarn around your finger/hand one time. Then carefully take the formed ring off of your finger/hand and adore your little beginning ^_^
Now grab your hook and start crocheting into this ring: the first stitch will resemble more of a pure chain stitch than a single crochet, but after that you can start counting and make as many stitched as called for by your pattern.
What you will have now is something that looks like this:
Now let the magic happen and pull the yarn end and ogle how the loop gets smaller and smaller until the center hole is closed.
Now place your marker and start increasing. The little disadvantage of a magic adjustable ring is the unstiffness: you will need to pull at the waste end again and again.
This isn't a very bad thing for most round projects but for making dolls it's not the best desired way. Dolls get pushed and pulled and squeezed and even washed and slowly the stuffing will come through at your center hole. This problem gets solved with the double ring.
Third: Start with a double ring
As written above the double ring is an advanced solution of a "simple" adjustable ring. The main difference is that you wrap the yarn twice instead of one time around you finger/hand. This way the center hole isn't able to get loose again once it's closed.
After you wrapped twice and carefully took off the created loops and adored them you start crocheting as my sticthes into both loops at once as wished. Now it's time to pull the ring closed. This is a little harder than drawing close a "simple" adjsutable ring. But you don't have to pull as hard at the end of your yarn as possible, this will only break your yarn or even create bad marks at your fingers. There is a little trick:
Pull the yarn end carefully and observe which of the two loops will get smaller (marked yellow).
Now stop pulling the end of the yarn and take the loop that was moving (yellow). Start pulling this loop and observe how the other loop gets drawn tight. When this loop is closed, grab the yarn end again and start tugging, the first loop (the one you just pulled on) will also draw close without any effort.
Tata! a double ring!
Place your marker and start your project. The center hole of a double ring will nerver ever get loose again.
=^_^=
At last let me show you all three versions next to each other:
first the chained version, in the middle the one with the magic adjusatble ring (after a few rows it got looser once more), and on the right side the double ring. The upper part of the picture shows the three methods directly after crocheting, below you can see how they look like after I pulled at the yarn end again and flattend them all out: they don't show much difference but sometimes you can feel it!
Extra TIP
when you use fun fur yarn or other novelty yarns the texture of the yarn will often prevent you from making a double ring. In such cases I am into the chain 2 method of starting a round project.
10/07/2008
it's autumn
and it's not raining! today it is very pretty weather and this was excellent since I needed to go to my local customs and I still feel a little groggy from the cold I suffered from the last week (having vacations and the flu - isn't this so typical? I don't think it's a very clever idea of our immune system to relax at weekends and holidays, although seeing this from a evolutionary point of vew it actually is VERY clever). Nevertheless the sun and the little walk out there did me very well, I really enjoyed it.
isn't this lovely? and who would have guessed that the customs officers would be really nice today as well? I received the little earrings I ordered a couple of weeks ago to present myself as a birthday present. They're made from the talented Jillian Lukiwski from the noisy plume at etsy. The red and very shiny stone is a carnelian. The earrings are very well made and suit my redhead very nicely. I think I will wear them with pride, because I love them! **imagine me smiling brightly**

Also I'm preparing to start my tutorial october, tomorrow I'll present the first episode on how to start an amigurumi, or better the different ways of casting on for crocheting in the round.
and todays earworm is
Das Spiel von Annett Louisan
I came across a poster promoting the current tour of Annett. And PoP there was the song dancing in my head. Haven't heard alot about her lately and therefore I will have a look at her new album Teilzeithippie, sounds interesting this part time Hippie.
Abonnieren
Posts (Atom)